Saturday, 15 December 2012

That Christmas Feeling - Spice Biscuits!


I am slowly getting into the Christmas spirit this year. Watching Nigel Slater on the TV last night, who has to be my favourite TV chef for his calmness and sheer gorgeousness of what he cooks, I suddenly knew I had to make some Christmas spice biscuits!

So I trundled off to Sainsbury's this morning which wasn't half as busy as I thought it would be (just wait for next weekend!) to buy the ingredients and cookie cutters I needed. I had to make do with hearts as the snowflake cutters were all gone.
I used Nigel Slater's recipe (see below) and ended up with three baking sheets of biscuits in different heart sizes.
 I decorated them with cinnamon icing in a ....let's call it "abstract" fashion with artistic industrial size blobs for added interest....... more is definitely more where I come from :D


They taste delicious (I've eaten three so far) and make your house smell beautiful!

The Recipe

70g butter
80g light muscovado sugar
2 tbsp treacle
250g plain flour
1/2 tsp baking powder
2 tsp cinnamon
1 tsp ginger (I put in two)
1 egg yolk
3 - 4 tsp milk

1. Cream butter and sugar
2. Beat in treacle and egg yolk
3. Add flour, spices and baking powder which have been sifted and mixed thoroughly beforehand
4. Add milk until dough resembles pastry and knead gently
5. Roll out thinly, cut out shapes and spread out on baking sheets
6. Cook at Gas Mark 4/350F/180C for approx 12 - 14 mins
7. Cool and decorate with water icing

Thursday, 29 November 2012

A Little Etsy Love


Thank you to Nancy of A Little Etsy Love for featuring my Etsy shop on the blog yesterday
And remember it's still 10% off everything in my shop til end of Dec 2012!


Monday, 26 November 2012

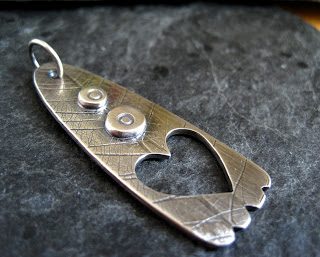
Finished! My Second Silver Jewellery Course Project


Here's the finished silver pendant I made as the second project for the silver jewellery evening class course I'm on. The "brief" for want of a better word, was amulets and charms. I didn't really know what an amulet was - I thought it was something you put things in - it's something you wear like a talisman to protect you from danger and bad luck so like a good luck charm really!

I loved the finger shape of an amulet I saw on a Jewish jewellery website so decided to go with that to start with. I also wanted to add texture with skeleton leaves and pierce out a shape as I haven't done any piercing before. I managed to break 3 saw blades piercing out the heart!


I melted some sterling silver to form balls then hammered and stamped them and soldered them above the heart. Then it was a case of filing and sanding, using the triangle file to add the cut in bits at the bottom and making and soldering a jump ring for hanging. I finished off by oxidizing it (of course!)


I'll be honest, the finished pendant is nothing like the original idea and design I drew apart from the shape and the pierced heart! It kind of evolved as I saw the shape and actual size of it as I was making it. The texturing is a bit uneven, the heart is off centre - it's definitely organic and a little bit quaint :D


I was the first one to finish - a couple of people on the course haven't even started their's yet (three weeks into the project!) and are still at the planning stage so for the next few weeks I can play and make what I like :D


Sunday, 25 November 2012

10% Off In My Etsy Shop? Yes Please!

I've decided to have a 10% off event in my Etsy shop
until 31 December. That's 10% off everything including my handmade findings!
Just use the code "CINNAMON" to qualify.


I felt the need to stamp circles on metal last week. I have a thing about circles which apparently goes back to my childhood. Way back when I was three and we lived in Toronto my Mum's friend Judy always knew which child had scribbled on her apartment wall in crayon { circles : me, other things : her son }
I still love circles today and they do feature in my jewellery quite a lot in one form or another :D


Not circles but leaf vein texture using skeleton leaves and the rolling mill at college on a piece of "practise" copper sheet which found it's way home with me and turned into a pair of earrings :D

Tuesday, 30 October 2012

New Earrings - A Bit Of A Stud Thing Going On!


Going to jewellery classes has made me want to conquer my still slight anxiety about soldering. I don't know why I'm anxious about it - the worst that can happen is you melt something (done that), get solder where you don't want it (done that too) or the soldered parts come apart when you quench (yes, done that too). So I thought I'd do something easy and make a few pairs of stud earrings.

I started simple with some flat discs in copper and silver that I textured using wire and my Bigshot then hammered in areas. I use the posts with the pads as I don't think my hand is steady enough to hold just a post in position while I solder it in place, in fact I know it isn't! I flow some solder onto the pad first then solder into place to make things easier.


Then I made two pairs of concave disc studs with a fine silver ball soldered in the centre. I like this design and the fine silver forms a smoother rounder ball than sterling. I textured the discs with a Vintaj folder and my Bigshot again and flowed solder onto the back of the silver balls. This a bit fiddly but I find you're less likely to get excess solder flowing where you don't want it by doing it this way, especially when you're soldering onto copper.


 I made myself a silver ring in this design a few weeks ago and kept meaning to make some matching studs to sell so now I have!

Spirals!

I've been sadly neglecting my beloved spirals for quite a while now but seeing the necklace Professor Alice Roberts was wearing on that BBC2 program last week (that I can't remember the name of!) made me want to make spirally things again. Her necklace is a series of linked silver spirals and very cool. I started by annealing some 14g copper wire, straightening it then hammering it a lot to flatten. After annealing the hammered wire again I coiled it into two spirals which after a bit of tweaking and pickling I soldered together......... then I soldered it again at the ends to make it more stable. After a lot of filing and sanding and thinking.... "Do I like these? Do I? I'm not sure, I think they're ok, I'll see what they look like when they're oxidized....." I've decided I do like them but there's room for improvement! And they look nothing like Alice Roberts' necklace :D


I'm going to make a silver pair but form the double spiral shape from one piece of wire which will do away with the ends which I should've hammered flatter on the copper pair so they would be easier to file and taper in a bit more neatly. I'm planning on putting a hole at the top so I can thread a balled piece of wire through to add beads (or something, not sure yet). Silver solder on silver will look better too :D


Tuesday, 23 October 2012

Silver Jewellery Class 1st Project - Textured Band Ring


I finished my first project for my jewellery class last week - a textured silver band ring. I've made a few copper and silver rings using wire at home but not from textured silver sheet so it was fun to learn.
The photo shows the ring before soldering - I wasn't convinced the join was tight enough but the teacher was happy with it and it soldered fine. I used some plastic netting with the rolling mill to create the texture. I love the rolling mill! I've ordered some skeleton leaves from ebay to use with it in the future as I love the vein texture you get from them.
After some filing and finishing with wet and dry the ring was ready for polishing. It came out lovely and shiny but then I decided I wanted to oxidize it so the teacher showed everyone how to do that with LOS. She told me to leave it for 24 hours before cleaning it up after oxidizing which puzzled me a bit as I normally clean up my oxidized jewellery straight away. I cleaned it up when I got home that night! A spell in the tumbler and it came out shiny with the textured areas darker from the LOS.


It's a bit scratched up now as I've been wearing it - and yes it did fit the finger I made it for!


This week we're planning a new project - amulets/charms. I've already got a good idea of what I want to make (kind of). We're also going to be shown reticulation, fusing and applying gold foil. I'm a happy bunny :D
 

Wednesday, 19 September 2012

Silver Jewellery Course and New Earrings

Next Tuesday night (25th Sept) I will be starting a 25 week silver jewellery class! I found out about it last year a couple of months too late but this year miraculously remembered about it in time and enrolled a few weeks ago. It was quite expensive but covers all those lovely techniques I either can't teach myself/am too scared to try myself or just really need an expert to show how to do it properly.
I know it definitely covers etching (yay!), soldering, stone setting, enamelling and ring making. Some of it I will know how to do but a lot I won't so I'm really looking forward to getting started. Slightly nervous too but once I've got over the "which building is it/who are all these strange people/where's the toilet" stage I know I'll be fine :D 

Finally got round to photographing a few pairs of earrings today - I was in one of those let's get organised and do the things that actually need doing and not spend all day experimenting with new design ideas moods, and the weather was perfect too.

The pair above are handcut flowers enamelled and wire wrapped to copper washers. I'm going to try the same idea with some soldered copper hoops (when I make them) for a more delicate version ......soon.......... :D


These are two copper discs rolled through my Bigshot with a Vintaj design (deco etch) folder then domed and pinned with sterling wire.


Sheet copper stamped with my favourite circle design then the earrings cut out and finished. I painted turquoise patina ink over the top and sanded back to reveal the design then oxidized and tumbled for just 15 minutes to it didn't take too much of the black off. Dark and a bit different.


Thursday, 13 September 2012

New Copper And Silver Earrings

I've been playing with my Bigshot and the Vintaj design folders again. I've decided to rechristen them "design" folders rather than etch folders as the end result looks nothing like an etched piece of metal!
I used 20g copper sheet annealed first to soften it then rolled through the Bigshot. It goes through fine but my cutting pads are suffering a bit and now are both bowed in the centre. Completely useless if I want to use my envelope dies so I guess I'll have to buy some replacement pads soon......


I made a simple pair in sterling silver too. I cut the shape using Xuron metal shears - very impressed with those and they save having to get my saw out and the ridiculous small plastic stool I have to sit on for piercing as the table is too low to use a normal chair!


I also did a bit of simple soldering and made these bead and hoop style silver earrings. Can you tell how much I love these czech glass rondelle beads?!


Tuesday, 4 September 2012

Antique Bronze Heart Charms with Turquoise Patina


I saw these cute machine-made (I'm not proud!) antique bronze tone heart charms and thought the design would lend itself to a bit of titivating with patina ink so that's what I did.


They are a nickel-free base metal with an antique bronze tone coating, hollow on the back with a hanging loop top centre. Very sweet and would look great as a simple pair of earrings or added to a necklace or bracelet design.


Sold in packs of four in my Etsy and Folksy shops!

Thursday, 16 August 2012

New Folksy Banner - That's Better!

You know when you look at your shop frontpage and think there's something missing? Well my Folksy shop has been looking, well, a bit colourless recently. My item photos are quite colourful but my banner was a bit dull and needed some work.
I remembered a pair of "traffic light" earrings I photographed last week made with colourful czech glass beads I bought from Lima Beads. I've been after the gorgeous pistachio green colour for a while and did see some on Etsy but thought I'd check at Lima Beads and they had the exact colour plus some lovely mustard yellow and an orangy-red in the czech glass so I bought them straight away!
I loved the three colours together so made a pair of earrings with some copper discs and used one of the photos to whip up a new banner. Much more colourful!

I took a lot of photos last week because we had sunshine in the UK - yes summer made a brief appearance again and now I just have to edit them all!

Sunday, 5 August 2012

Coloured Copper Headpins

A new variation on my copper ball headpins - coloured balls! The headpins are made with a torch, pickled, trimmed, oxidised and cleaned up, tumbled and then the fun begins. I painted the ball ends with different coloured patina inks and sealed with a coat of varnish

 Multicoloured - like mini balloons on sticks!

I found a sponge pan scrubber very useful for sticking the headpins into to let them dry. I think they're really sweet and a great way to add a bit of colour. You could twirl them to make dangling tendrils or make a wrapped loop at the top to make little dangles or just use them as good old headpins!


Available in turquoise, green, lilac, pink and mixed colours and currently being added to my Folksy and Etsy shops


 .................now i just need to make some for myself :D


Tuesday, 31 July 2012

Mini Envelopes - The Wonderful World Of Papercraft

Since buying a Sizzix Bigshot recently for embossing metal I've suddenly discovered the world of dies. Dies are wonderful things you can use with your Bigshot, Cuttlebug, etc to cut out all sorts of lovely things including envelope templates. I also discovered the world of scrapbook paper. I love patterned paper and most things stationery. I used to love going into WH Smiths each year to buy my new pencil case, pens, rubbers and pencils for the start of the new school year (that was quite a long time ago!) and I still like buying stationery stuff even if I don't really need it!

I thought I'd use my Bigshot to make some mini envelopes so after trawling the internet for a suitable die and picking up a scrapbooking pad from The Range I ventured into papercraft. I've got to say it was a nice change from metal and beads and really therapeutic to do. The folding and glueing is my favourite part and I loved seeing these cute little envelopes take shape.


It then struck me that maybe I wasn't allowed to make stuff to sell from the scrapbook paper I'd used. I know a lot of companies have an angel policy but I couldn't find one for Grant Studios who created the artwork for the paper so a quick email to them and a very quick reply (on a Sunday from Australia!) and they were fine for me to sell anything I made with their paper. The issue they have is if someone claims the artwork as their own or reproduces it to sell. I also checked with the company who make My Mind's Eye scrapbook paper and they were fine about it too. So I felt slightly relieved to know I was ok to carry on.


I've just started listing the mini envelopes in my Folksy shop and I'm going to add them to my eBay shop in a couple of weeks too. I have no idea if they will sell but I like making them so hopefully they will then I can make some more!
The envelopes measure just under 3.25 inches x 2.25 inches with a pretty scalloped edge and they are just so darned cute!


I tried Fotofuze as I'd used a white background for the photos and I was really impressed with the results..........until I noticed how some of the colours had changed and no amount of editing could sort them out. Then I noticed the photos weren't as clear. Fotofuze reduces the image size (to half in my case) and that caused them to be pixelated when I used the zoom while I was trying to edit the colours. So after spending an afternoon playing around with them I went back to normal editing - they don't have the same blinding white surrounding them but at least the colours are true!


Wednesday, 25 July 2012

New Embossed Metal Earrings


 I posted recently about practising using my Bigshot to emboss metal and now I have some finished earrings to show!
The copper "pansy" earrings above started life as copper discs that I used a Vintaj Deco Etch folder on to create the pretty flower and petal effect. The end result with the etch folders gives a more stamped look than etched to be honest but I do like it and have bought a couple more of the etch folders since.
The petals were created using a file then the flowers were sanded and domed and the bead and earwires added. I could've used my saw to cut out the petal shapes but decided to sit in the sun and file industriously for 15 minutes instead!


Purple lampwork earrings with the same flower design


Serpentine beads with copper teardrop earrings


Embossed Copper Disc earrings


That flower design again this time in stud form!

                          
                        Embossed copper discs with czech glass beads

All soon to be listed in my Folksy and Etsy shops


Tuesday, 10 July 2012

All Together Now!


After taking up Folksy's offer of their Plus account recently I've decided it makes sense to combine my two Folksy shops and move my handmade findings into my jewellery shop.
So..................after spending rather a long time (let's just say it was most of Saturday) copying and pasting descriptions from one shop to another, my new combined jewellery and findings shop is finished. I even relisted a load of jewellery too to get the front page of my shop looking like a jewellery shop again. I'm liking the Plus account very much!

As for the tediousness of doing it all I know Folksy are working on speeding up the listing process but dear God! At the same time as listing my findings/waiting for pages to load, I managed to a) edit 25 photos, b) use my Bigshot to cut out a load of mini envelopes and c) fold and glue most of said mini envelopes together.