Friday, 16 October 2015

What I've Been Doing Lately...Etched Bangles


One of the joys I've found with making bangles is the infinite variety of designs you can make. I use a lot of copper for bangles and up to fairly recently most of my designs have been made from round wire that I've hammered. It wasn't until I had a custom request for a "bark" texture bangle in sterling {think flattened shape with hammered line marks} that I made my first flat bangle.

Having a flat surface gives you more options for design so I decided to try some etched patterns on the flat style bangles.

I started with lengths of the round copper wire which I annealed to soften it then rolled it through the rolling mill until it was flat enough for what I wanted to do.


I then annealed the flattened wire and straightened it on a steel block before cutting it to size and filing the ends flat


The bangles ready for soldering.


After soldering the bangles, cleaning up and shaping them the next step was to apply the resist on the areas of the bangle I didn't want to etch. I used a Sharpie and covered the inside of the bangles and then around the edges.


I'd never etched anything with a solder join before so I made sure the solder join on the bangles was covered with the Sharpie too. I didn't take any photos of the "design" part but I basically drew lines in different thicknesses on the front of the bangles with the Sharpie.


 I also tried another way to etch the bangles by applying the resist before the bangle was soldered. Having the metal flat worked better for the stamped designs as it was impossible to stamp the formed bangles without the ink smudging and it looking a bit of a mess - so I did it on the flat piece of metal and soldered the bangle afterwards. The only drawback with doing it that way is you remove some of the etched design when you're cleaning up the solder join.

I forgot to photograph the etching bit {sorry!} but I etched the copper for about 30 minutes. The time it takes to etch depends on how fresh your ferric chloride is and how deep you like to etch.


Cleaning off the Sharpie marks after etching.


The cleaned up bangle.


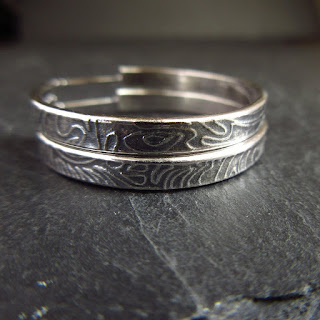
I then oxidized the bangles and cleaned them up with wire wool. I also tried using vinyl stickers as the resist on some of the bangles. I liked the subtle effect of their patterns. The zigzag {2nd left} is my favourite.


Overall I like the "stripe" design best. It was fairly time consuming to do but I love it's rustic charm. 


I think I could achieve a similar look without etching and doing lots of tedious  er....fun..... colouring in with Sharpie pens. The rolling mill and some thin gauge wire beckons......


Copyright © 2015 Cinnamon Jewellery. All rights reserved.

Friday, 9 October 2015

My Amazon Handmade Store Is Now Open!


You may or may not be aware that Amazon have branched out into their own handmade department. Yes, Amazon is slowly taking over the world and their newest venture is Handmade at Amazon. Previously handmade items were available on Amazon but they were lumped in with everything else but now if your items have been approved they have a new home in Handmade.

Above is a screen shot of my shop on Handmade. The screen shot only captured the top half of the page but I like the way it looks. I'm trying my copper and bronze bangles on there to start with and only have eight listed so far. I'm planning on listing some more soon....

It's been a bit of a bumpy ride getting to the point where I'm ready with my shop and items. Never again will I grumble about Etsy and the tweaks they make! Using Etsy as a seller is a breeze compared to Amazon! Amazon is clunky to list on in some ways - no copy function, no paragraphs in descriptions and strictly no using html to create line breaks and paragraphs in descriptions resulting in one long block of text. Not easy to read and we creative souls do like to set out our item pages nicely and include important info which may be missed in one long ramble of words. Oh well.

Setting up shipping is not as easy as it is on Etsy either - for example you can't create shipping profiles for specific items as far as I know. There are also sections for your own shipping and returns policies and useful info like an FAQ page but when you fill them in and save them they don't appear anywhere in your shop.....

Not to mention some of Amazon's rules - the seller pays shipping cost for returns, the seller makes sure any possible additional costs to the buyer are paid for at time of purchase such as import fees. I've set up my shipping for the US, Canada and Asia so I shouldn't have a problem with customs fees as their goods value thresholds for any duty are set at a sensible level unlike the UK! As for paying shipping for an item to be returned - that's part of selling on Amazon so that's what I'll have to do.

Handmade at Amazon is just on the .com site at the moment which is fine but does create issues for anyone from the UK selling there. One issue being I can't set up UK shipping separate from Europe as the UK is part of Europe when listed on an American site. I get that and I'm not complaining! Maybe one day Handmade at Amazon will appear on the .uk site too.
Being an American site listing prices and shipping in dollars is easy enough but means I'll need to check my prices occasionally as the conversion rate obviously varies.

The main grumble I've had joining Amazon as a seller in the run up to launching is the inconsistency in the answers given to various questions lots of sellers have asked the Amazon admin {me included}. The main one being do we have to post everything with a tracking number. The answers from Seller Support pinged around the handmade forum like a ball in a pinball game - "Yes you do need to send things tracked", "No you don't need to send things tracked", "Yes, you do", "No you don't", "Yes", "No", "Yes", "No" and finally in the revised Handmade seller guide they issued 2 days before launch - No you don't.
Great news for me as tracking doubles my international postage cost but for God's sake! I had set up my shipping to include Tracked and Signed and have now changed it to normal International Standard.

There are a few other issues but I'm sure they will be ironed out eventually as it rolls along. I've no idea if my bangles will sell but I wanted to give it a go at least until the shop fees start in August 2016. Then it's $40 a month on top of the 12% fee for each transaction. Time will tell!
In the meantime look out for the Handmade banner and check it out next time you're on Amazon.com.

handmade at Amazon


Copyright © 2015 Cinnamon Jewellery. All rights reserved.

Friday, 2 October 2015

A DIY Revolving Soldering Board And Some New Enamel Earrings


So, it's been a while. My last blog post was the end of August. I decided to take a few weeks off in September to just have a break and to get over the "bangle-burnout" I was suffering from. July and August were very busy in my shops for bangles especially and everything else {ironing mostly} was just not getting done... plus I just felt like a break. 

I had a long list of things I had to do during my break which included doing some decorating, make new stock, make some new silver bangles for hallmarking, do the ironing {!}, tidy kitchen cupboards, clean my shed and varnish my jewellery bench, register on Amazon Handmade, update my website and mourn my sweet cat Tuppence. Hang on! That last bit wasn't part of the plan but sadly old age caught up with her and she was put to sleep on Sept 2nd.


So I spent a couple of days feeling sad and missing a cat who had become my constant companion for the last few years. She liked to sit on my knee when I was at my computer and would stare intently at the screen as I attempted to type and quite often would help me to type too, adding a long line of 0000000000000000's to my text when I least expected it. 

I did get quite a lot of the things on my list done despite feeling a bit down. I made some new stock, including the enamel earrings above, which I'll post about next week plus I came up with a really cheap alternative to the shockingly expensive revolving soldering stand that Cookson Gold sell for £43! Ok, the Cookson Gold stand is made of cast iron and it's a lovely shade of blue. Mine cost me just over £2 and bit of Super Glue.

I bought some lazy susan bearings from qualitybearingsonline.com which are very cheap - £2.19 and free delivery - took an old soldering board and some Super Glue and glued the bearings onto the board.


I was going to screw the bearings onto the board but it just started to crumble when I tried drilling a hole in it so I tried attaching it with the glue and it worked fine.
I then put another soldering board on top and ta da! A revolving soldering board!


The board sits quite safely on top of the bearings and I can raise the height of it if I need to by just sitting it on top of a few more boards. I'm sure a slightly bigger board would work ok on it too. I've used it a couple of times and it's great! It's really useful for the type of bangles I make with a length of wire coiled and twisted round the bangle as I like to solder the wire in place around the bangle.


Being able to turn the soldering board as I pick solder the wire in place makes life a bit easier and I'm all for anything that makes soldering easier :D


Copyright © 2015 Cinnamon Jewellery. All rights reserved.

Thursday, 27 August 2015

Featured In Making Jewellery Designer Profile!


Issue 84 of Making Jewellery magazine came out last week and as a MJ contributor it's my turn to be featured in the Designer Profile section!
I had to answer 8 questions asking things such as - What made me take the plunge to start selling my jewellery/What are the challenges of working with enamel and If I wasn't a designer I would be...
There's some nice photos of my jewellery too.


I look a bit hot and bothered in my photo - for some reason I thought it would be in black and white so didn't worry about editing the rosy cheek thing I had going on before I sent it off :D


Copyright © 2015 Cinnamon Jewellery. All rights reserved.

Thursday, 20 August 2015

Liquid Enamel Abstract Scribble Earrings


I've had an idea floating around in my head this last week or so to make some enamel earrings using liquid enamel over a black base with an abstract and simple {very!} scratched design. 
My previously mixed liquid enamel colours had sat on the shelf for a few months since I last used them and had dried up so I needed to add some distilled water to them and stir like a mad thing to get them mixed and smooth again before I could start.

I decided to create a couple of new colours from two existing liquid enamel shades so added some more yellow and green to a boring green colour I had to produce the bright green shade in the middle. I also added more blue and green to another mix to produce the greeny-blue shade on the right. That's the great thing with liquid enamels - you can mix them and create new colours.

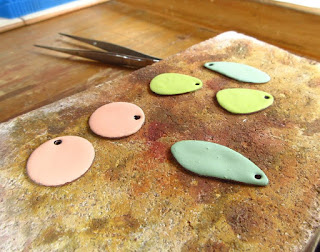
To begin I enamelled some copper shapes on both sides with an opaque black then applied a layer of liquid enamel.


On my first attempt the liquid enamel was too thick and when I scratched the design most of it flaked off in big chunks. So after a bit of swearing, I washed it all off, then added more distilled water to my liquid enamel colours and started again...


Liquid enamel layer too thick - you can see the bumps in it as it's drying.


Second attempt - much smoother. I've found the liquid enamel needs to be thick enough to cover the enamel/metal base properly but liquid enough to flow and find it's own level, especially if you need to add a bit more.

Now I did forget to take a photo of the scratching the design bit in my excitement but this is what I used.


It's a tool used in metal clay work and it should have a metal ball at the end. I have no idea what I did to it to make the ball fall off but filed and sanded the end was ideal to use to scratch through the liquid enamel layer!


The green-blue earring just after firing. The colour gets brighter as the copper and enamel cools. The scratched design was experimental and quite "loose" as you can see :D I think I'll call it "abstract"...
 I find it hard to be very precise with sgraffito designs!

The finished earrings. 


I got some crackling effects going on too which was unexpected but I quite like the look.
 I'm hoping my next attempts will be better. I think I'll add a bit more water to the liquid enamel so it's a bit thinner in the hope that will avoid the larger chunks coming off as I scratch the design.
As ever, working with enamel is a learning curve but it's fun to experiment :D


Copyright © 2015 Cinnamon Jewellery. All rights reserved.

Thursday, 6 August 2015

New Hoops, New Bangles And A Small Soldering Obstacle Overcome


After a frenzy of bangle making recently I had a couple of slow days so I grabbed the chance the make some new stuff. I have a long list of "things to make" but decided to go for a few pairs of hoop earrings with post fitting. I've sold a few pairs recently so they needed replacing.

I started with a couple of pairs in silver - a simple hammered pair and a flattened design with embossed pattern...


I oxidized both pairs but I think the embossed pair might have looked nicer left shiny... {will do that next time}. They do look lighter in real life than they appear in this photo.

I also made a pair of hammered texture hoops in bronze and copper. I'm liking bronze more and more these days. Grappling with the thicker gauges can be a challenge as it's a harder metal than copper but the lovely golden brown tones you get when you oxidize it then clean it up with wire wool are lovely.


The more golden brown tones of bronze.


The slightly more red tones of copper.

I made some "new" bangle designs too. I say new but it's not really new it's just a hammered texture that I haven't done before on a bangle. And I got to use my lovely Fretz goldsmiths hammer for the first time. I now know why they cost a lot more than some other hammers and why they are totally worth it.


And A Small Soldering Obstacle Overcome.....
Anyone who solders knows it can be tricky and especially tricky when you want to solder a tiny thing to a much bigger thing. Things melt. Up to now I have used stud post fittings that are attached to a pad. They make it easier to solder to the earring and can add more stability. You can still melt them though but I haven't done that in a long time. The last hoop earrings with post fittings I made had the post and pad fittings that I then trimmed as they were bigger than the end of the hoop wire. This time I decided I needed to just get over it and learn to solder the tiny posts to my hoops instead.


The tiny piece of wire that makes a stud post compared to the post and pad version.

Learning to solder the posts onto my hoops would be quicker, I'd have less finishing, if any, to do and it would also be cheaper. So I melted some solder onto the end of the post, positioned the hoop so nothing would move {very important} and held the post in my tweezers while I heated the hoop. Once the hoop was at the right temperature I touched the post to it and the solder flowed. It worked and the post soldered securely to the hoop. I just have to remember to move the flame away once the solder has flowed! I didn't melt anything so it was a success and another little soldering hurdle overcome. Yay!


Copyright © 2015 Cinnamon Jewellery. All rights reserved.

Thursday, 23 July 2015

Claiming A Refund For A Customs Fee Paid On A Returned Item


Up until a couple of weeks ago this was a new one on me....yes having to pay a Customs fee on a returned item, in other words having to pay import VAT on my own item to get it back!

I'm totally aware of the Customs charge that has to be paid on items imported into the UK from outside the EU that have a value of more than £15 but when a customer from the US asked if she could return a silver bangle recently as it was too large and she wanted a smaller size of course I said yes that's fine, just send it back and I'll get a smaller size made. She was happy to pay another shipping charge for the replacement so all I had to do was wait for it to arrive...

It wasn't until the postman left a card informing me there was a customs charge to pay on something - I wasn't sure what it was at that point and thought maybe I'd forgotten I'd bought something lovely.....then it suddenly dawned on me what it was for. The returned bangle! So after feeling quite annoyed and thinking the profit on this bangle is slowly disappearing, I then thought that surely you shouldn't have to pay a Customs charge on a returned item. I decided to investigate....

After a quick bit of Googling I found a form to download on the GOV.UK website. The form is BOR286 and can be used if you believe that "Customs Duty or import VAT has been incorrectly calculated on your imported item" or if like me you've paid a charge on a returned item.


It's just a one page form and you need to send all the labels attached to the package by Customs {I just sent the whole packaging!}, plus proof of the sale and that the item is a return.
I sent the form and all the proof they asked for to the Border Force address and had a reply about a week later to tell me they would refund the Customs charge - great! The don't refund the Royal Mail £8.00 handling charge however which is understandable as that isn't anything to do with them and was actually more than the Customs fee I paid {how annoying!} Still at least I'll get something back.

So what could I have done to avoid this? Asking my customer to mark the customs form she attached to the package as "returned goods" which obviously never occurred to me. But now I know and if it ever happens again I'll make sure I do just that.


Copyright © 2015 Cinnamon Jewellery. All rights reserved.