Thursday, 27 August 2015

Featured In Making Jewellery Designer Profile!


Issue 84 of Making Jewellery magazine came out last week and as a MJ contributor it's my turn to be featured in the Designer Profile section!
I had to answer 8 questions asking things such as - What made me take the plunge to start selling my jewellery/What are the challenges of working with enamel and If I wasn't a designer I would be...
There's some nice photos of my jewellery too.


I look a bit hot and bothered in my photo - for some reason I thought it would be in black and white so didn't worry about editing the rosy cheek thing I had going on before I sent it off :D


Copyright © 2015 Cinnamon Jewellery. All rights reserved.

Thursday, 20 August 2015

Liquid Enamel Abstract Scribble Earrings


I've had an idea floating around in my head this last week or so to make some enamel earrings using liquid enamel over a black base with an abstract and simple {very!} scratched design. 
My previously mixed liquid enamel colours had sat on the shelf for a few months since I last used them and had dried up so I needed to add some distilled water to them and stir like a mad thing to get them mixed and smooth again before I could start.

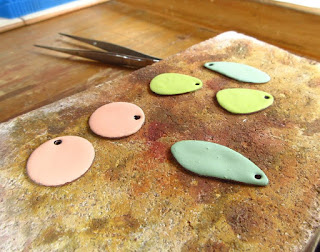
I decided to create a couple of new colours from two existing liquid enamel shades so added some more yellow and green to a boring green colour I had to produce the bright green shade in the middle. I also added more blue and green to another mix to produce the greeny-blue shade on the right. That's the great thing with liquid enamels - you can mix them and create new colours.

To begin I enamelled some copper shapes on both sides with an opaque black then applied a layer of liquid enamel.


On my first attempt the liquid enamel was too thick and when I scratched the design most of it flaked off in big chunks. So after a bit of swearing, I washed it all off, then added more distilled water to my liquid enamel colours and started again...


Liquid enamel layer too thick - you can see the bumps in it as it's drying.


Second attempt - much smoother. I've found the liquid enamel needs to be thick enough to cover the enamel/metal base properly but liquid enough to flow and find it's own level, especially if you need to add a bit more.

Now I did forget to take a photo of the scratching the design bit in my excitement but this is what I used.


It's a tool used in metal clay work and it should have a metal ball at the end. I have no idea what I did to it to make the ball fall off but filed and sanded the end was ideal to use to scratch through the liquid enamel layer!


The green-blue earring just after firing. The colour gets brighter as the copper and enamel cools. The scratched design was experimental and quite "loose" as you can see :D I think I'll call it "abstract"...
 I find it hard to be very precise with sgraffito designs!

The finished earrings. 


I got some crackling effects going on too which was unexpected but I quite like the look.
 I'm hoping my next attempts will be better. I think I'll add a bit more water to the liquid enamel so it's a bit thinner in the hope that will avoid the larger chunks coming off as I scratch the design.
As ever, working with enamel is a learning curve but it's fun to experiment :D


Copyright © 2015 Cinnamon Jewellery. All rights reserved.

Thursday, 6 August 2015

New Hoops, New Bangles And A Small Soldering Obstacle Overcome


After a frenzy of bangle making recently I had a couple of slow days so I grabbed the chance the make some new stuff. I have a long list of "things to make" but decided to go for a few pairs of hoop earrings with post fitting. I've sold a few pairs recently so they needed replacing.

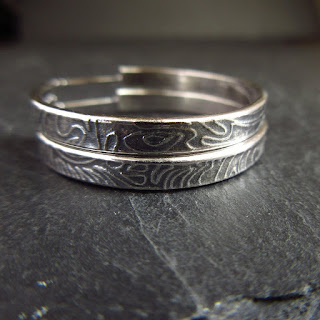
I started with a couple of pairs in silver - a simple hammered pair and a flattened design with embossed pattern...


I oxidized both pairs but I think the embossed pair might have looked nicer left shiny... {will do that next time}. They do look lighter in real life than they appear in this photo.

I also made a pair of hammered texture hoops in bronze and copper. I'm liking bronze more and more these days. Grappling with the thicker gauges can be a challenge as it's a harder metal than copper but the lovely golden brown tones you get when you oxidize it then clean it up with wire wool are lovely.


The more golden brown tones of bronze.


The slightly more red tones of copper.

I made some "new" bangle designs too. I say new but it's not really new it's just a hammered texture that I haven't done before on a bangle. And I got to use my lovely Fretz goldsmiths hammer for the first time. I now know why they cost a lot more than some other hammers and why they are totally worth it.


And A Small Soldering Obstacle Overcome.....
Anyone who solders knows it can be tricky and especially tricky when you want to solder a tiny thing to a much bigger thing. Things melt. Up to now I have used stud post fittings that are attached to a pad. They make it easier to solder to the earring and can add more stability. You can still melt them though but I haven't done that in a long time. The last hoop earrings with post fittings I made had the post and pad fittings that I then trimmed as they were bigger than the end of the hoop wire. This time I decided I needed to just get over it and learn to solder the tiny posts to my hoops instead.


The tiny piece of wire that makes a stud post compared to the post and pad version.

Learning to solder the posts onto my hoops would be quicker, I'd have less finishing, if any, to do and it would also be cheaper. So I melted some solder onto the end of the post, positioned the hoop so nothing would move {very important} and held the post in my tweezers while I heated the hoop. Once the hoop was at the right temperature I touched the post to it and the solder flowed. It worked and the post soldered securely to the hoop. I just have to remember to move the flame away once the solder has flowed! I didn't melt anything so it was a success and another little soldering hurdle overcome. Yay!


Copyright © 2015 Cinnamon Jewellery. All rights reserved.