Showing posts with label cinnamon jewellery. Show all posts

Thursday, 27 August 2015

Featured In Making Jewellery Designer Profile!


Issue 84 of Making Jewellery magazine came out last week and as a MJ contributor it's my turn to be featured in the Designer Profile section!
I had to answer 8 questions asking things such as - What made me take the plunge to start selling my jewellery/What are the challenges of working with enamel and If I wasn't a designer I would be...
There's some nice photos of my jewellery too.


I look a bit hot and bothered in my photo - for some reason I thought it would be in black and white so didn't worry about editing the rosy cheek thing I had going on before I sent it off :D


Copyright © 2015 Cinnamon Jewellery. All rights reserved.

Thursday, 6 August 2015

New Hoops, New Bangles And A Small Soldering Obstacle Overcome


After a frenzy of bangle making recently I had a couple of slow days so I grabbed the chance the make some new stuff. I have a long list of "things to make" but decided to go for a few pairs of hoop earrings with post fitting. I've sold a few pairs recently so they needed replacing.

I started with a couple of pairs in silver - a simple hammered pair and a flattened design with embossed pattern...


I oxidized both pairs but I think the embossed pair might have looked nicer left shiny... {will do that next time}. They do look lighter in real life than they appear in this photo.

I also made a pair of hammered texture hoops in bronze and copper. I'm liking bronze more and more these days. Grappling with the thicker gauges can be a challenge as it's a harder metal than copper but the lovely golden brown tones you get when you oxidize it then clean it up with wire wool are lovely.


The more golden brown tones of bronze.


The slightly more red tones of copper.

I made some "new" bangle designs too. I say new but it's not really new it's just a hammered texture that I haven't done before on a bangle. And I got to use my lovely Fretz goldsmiths hammer for the first time. I now know why they cost a lot more than some other hammers and why they are totally worth it.


And A Small Soldering Obstacle Overcome.....
Anyone who solders knows it can be tricky and especially tricky when you want to solder a tiny thing to a much bigger thing. Things melt. Up to now I have used stud post fittings that are attached to a pad. They make it easier to solder to the earring and can add more stability. You can still melt them though but I haven't done that in a long time. The last hoop earrings with post fittings I made had the post and pad fittings that I then trimmed as they were bigger than the end of the hoop wire. This time I decided I needed to just get over it and learn to solder the tiny posts to my hoops instead.


The tiny piece of wire that makes a stud post compared to the post and pad version.

Learning to solder the posts onto my hoops would be quicker, I'd have less finishing, if any, to do and it would also be cheaper. So I melted some solder onto the end of the post, positioned the hoop so nothing would move {very important} and held the post in my tweezers while I heated the hoop. Once the hoop was at the right temperature I touched the post to it and the solder flowed. It worked and the post soldered securely to the hoop. I just have to remember to move the flame away once the solder has flowed! I didn't melt anything so it was a success and another little soldering hurdle overcome. Yay!


Copyright © 2015 Cinnamon Jewellery. All rights reserved.

Thursday, 9 July 2015

New Designs - Enamel Earrings And Copper Bangles


I've been trying out some new designs with my enamel earrings recently by combining a layer of etched copper and a layer of enamel beneath it. The copper layer has pierced out sections which allow the enamel colour to show through as the earrings are worn. I've made just two pairs for now in orange and blue and it's possible the design idea may evolve if I think hard enough about it....... :D


I've also made a few new copper bangle designs partly as a result of a custom order for two bangles in sterling silver. Having copper wire meant I could try out what my customer was asking for using a less expensive metal first until a decision was made.
This inspired me to make a couple of new designs and an improved version of a recent addition to my bangle-ing enterprises.
The first is a hammered copper bangle made from 4mm round wire.


I kept the round shape by hammering the texture before the bangle was soldered {which was quite a lot of hammering!} instead of what I normally do which is to solder the wire then hammer the texture when the bangle is on the bangle mandrel which results in the wire being flattened slightly. The result is a lovely chunky, substantial bangle.

The second new design is a triple set of textured bangles with three rounded square shape rings linking them together.


I also made another loopy bangle this time making sure I had enough wire to form 7 loops instead of the 6 loops I made with the first attempt. The loops are also more upright than the first bangle.
I think it looks like a little copper tiara.......


Having an odd number of loops in the new version means the straight part of the wire is at the same level at either end of the loops rather than at opposite points as it was with the first attempt you can see in the photos here...


I'm very tempted to make a bangle that is almost entirely loops with a small section of straight wire for the join. I think that idea might need a bit of tweaking and the copper wire a lot of annealing but I'm sure it will be do-able!


Copyright © 2015 Cinnamon Jewellery. All rights reserved.

Thursday, 2 July 2015

A New Copper Loop Bangle And How I Made It


I started making copper bangles sort of by accident. I had some thick gauge copper wire and didn't know what to do one night at a jewellery class I was at so decided to experiment. And I haven't looked back. They have proved to be very popular especially with men buying gifts for their copper wedding anniversary -  usually leaving it to the last minute! 

So it makes sense to expand on the designs I make which is why I experimented with this loop bangle recently. I cut a length of 2.6mm {10g} round copper wire and annealed it so it would be easier to shape. I guessed the length I would need - I had no idea how long the wire would need to be at this point. I used a bezel mandrel to form the loops starting at the centre point of the wire.


I had enough wire to form six loops with some left for the straight section. I annealed the wire again and hammered the curved sections then used a texturing hammer to add some pattern to the loops and the straight wire.


The next step was to solder the loops at the point where they touched each other. This would give the bangle stability. Without thinking I bent the ends of the wire up then realized I'd bent them the wrong way! I wanted to solder on the back of the loops {what would become the inside of the bangle} to minimize the amount of solder getting onto the front textured side of the wire. * I've since realized I didn't need to bend the ends of the wire at all, I can still solder the loops with the straight bits sticking out at either end!* ** Edited {again!} to add the reason I bent the wires in the first place was so the bangle would fit in my pickle pot - I knew there was a reason :D

I overcame my slightly senile moment by building a mini mountain from broken bits of soldering block so the wire ends could hang over the edges.


After soldering. 
A bit of clean up to do but most of it's on the smooth side so not too difficult to do.


After cleaning up the solder joins I straightened the wire and cut the bangle the right length for a medium size.

  
Flux applied and ready for soldering the join.


The bangle cleaned up and shaped before oxidizing in LOS.

 It was the prototype after all and it would look better with another loop. I always think an odd number looks better than an even number with things decorative. I've worked out the length of wire I need to start with to allow for that plus next time I need the get the loops a bit more upright and graduated in size which will hopefully stop the bangle sitting at an angle as much.

But for a first attempt I'm happy with it and it's just been listed on Etsy. I can see a few decorative options for the design too - I'm thinking silver balls and possibly coils.... :D


Hallmarked!
A bit late but this is the hallmark for my sterling silver bangles! I was so excited to see it when my bangles arrived back from the London Assay Office. I asked for a 3D laser mark as big as they thought suitable as my stamp is quite small at 0.75mm. I'm pleased to say I've sold a few of the hallmarked bangles too!


Copyright © 2015 Cinnamon Jewellery. All rights reserved.

Wednesday, 24 June 2015

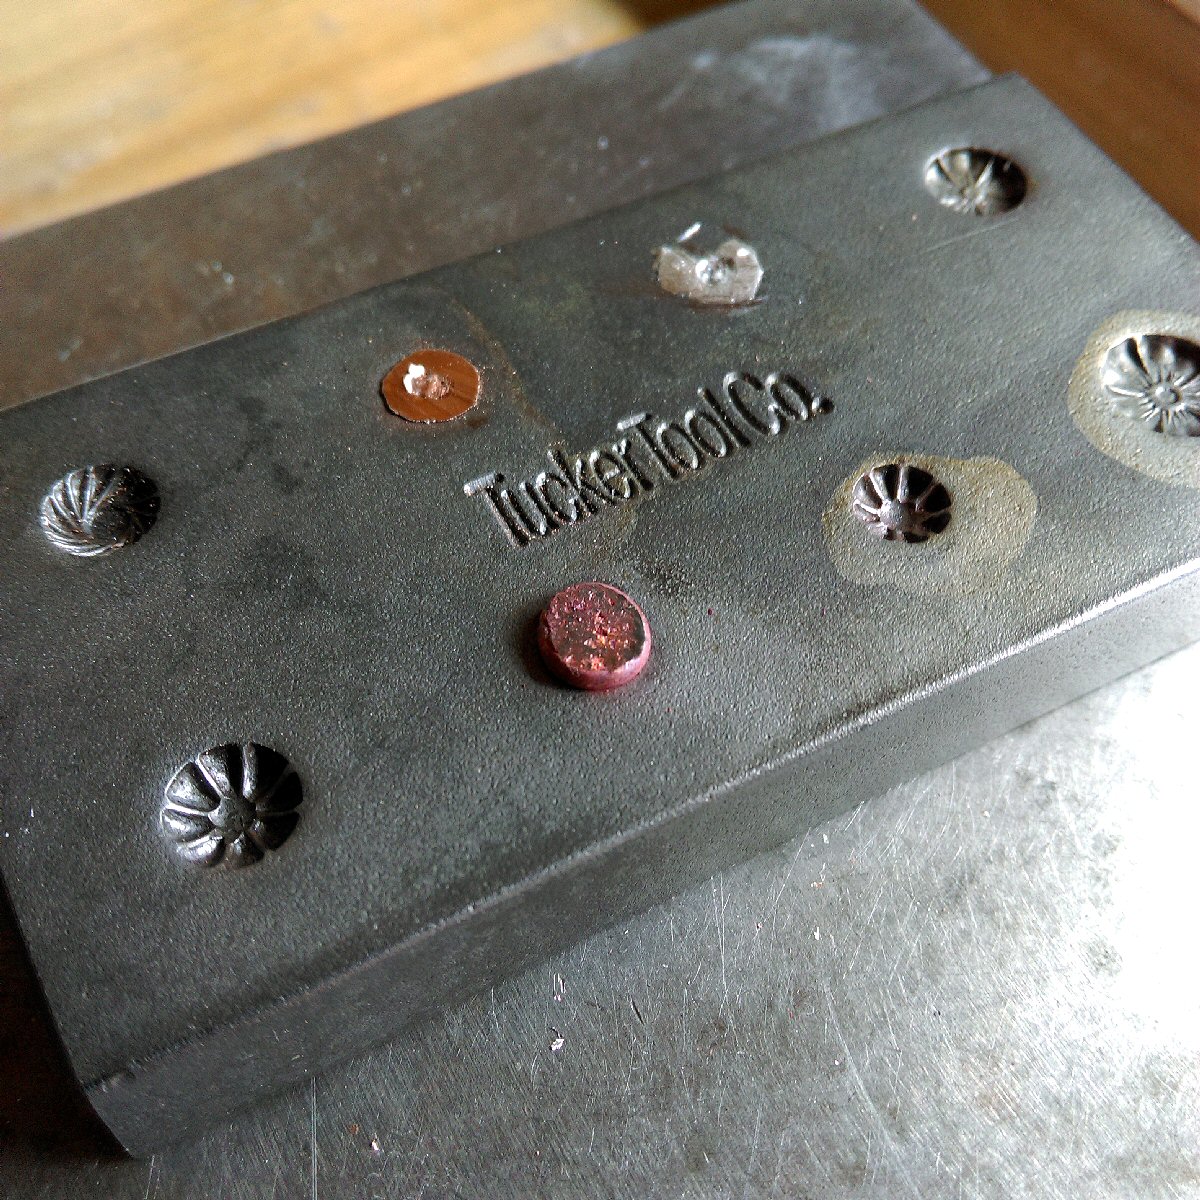
Having Fun With A Tucker Tool Shot Plate


I first came across these cool Tucker Tool dies in a Soham Harrison video on YouTube a while ago and immediately loved the decorative balls you could make with them. Then I realized you could only get them from the US and they were a bit hard to get hold of. Monsterslayer.com seemed to be permanently out of stock and another site I found that stocked them didn't reply to my email asking if they posted to the UK.....so I sort of forgot about it for a while.

Then I noticed Monsterslayer.com did have them back in stock and in a moment of over-indulgence ordered one knowing full well the postage was going to be quite high and that I'd have import VAT plus Parcel Force's stupidly high {even higher than Royal Mail's} handling charge on top. So it worked out to be a pretty expensive bit of metal.

You may have noticed the scratches on the plate in the photo......it didn't arrive like that - they were caused by me and a ball burr. But more of that later.

I started by melting some bronze scrap into balls and merrily hammered the first one in one of the holes on the shot plate.


It got stuck....
 So I tried using a fine silver ball to see if that worked any better. That got stuck too. It's recommended that you hammer a nail set or something similar into the back to prise the ball out. I used a centre punch but it wouldn't grip the metal and came out again. I hammered it in again and again but it just wouldn't stick into the metal. I then cut the excess off with a saw {which is why the back is flush with the plate in the photo} and tried heating the whole plate in the hope the silver and bronze would soften and I'd be able to get it out that way. That didn't work either. 

I was now beginning to think this purchase may have been a very expensive mistake! I decided to have another go and yes that ball got stuck too! 


                        The two holes in the back of it are from the centre punch in an attempt to get it out.


 My next attempt did work. The bronze ball was a bit mishaped to begin with which is why it's not perfect and there's a bit of a dent in the top but I'm just grateful it worked!


 I didn't hammer it as hard this time and it came out all by itself. I tried adding a bit of oil to the plate to help and things did improve as I got used to how hard and how many times to hammer the balls. I did manage to produce a few in bronze and fine silver that are usable. 


Then I watched a great YouTube video by Leslie Villarreal that shows how to use the shot plate and how to get the bloody balls out afterwards - I really wish she'd posted it a couple of weeks ago :D 

After watching it I feel more confident in what I'm doing and will have my oil and nail set ready for action next time I have a go!


Copyright © 2015 Cinnamon Jewellery. All rights reserved.

Tuesday, 9 June 2015

New Torch Enamel Project In Making Jewellery Magazine


I was on holiday last week but just before I went away to the land of beautiful sandy beaches and castles - Northumberland in other words - I had another step-by-step torch enamel project in issue 81 of Making Jewellery!

The magazine came out on May 28 and this time the theme for our projects was "tropical".


I decided to go for a colourful combination of orange and seafoam opaque enamel colours and make a hoop style earring with turquoise jasper bead decoration on the earwires. As we have to provide three pieces I also made another pair of earrings with turquoise jasper dangles and a pendant with {you've guessed it!} turquoise jasper bead links.

I've done a few projects for magazines now but I still get a little thrill every time I see one of my projects finished and published!


Copyright © 2015 Cinnamon Jewellery. All rights reserved.

Thursday, 14 May 2015

It's Been A Bit Of A Bronze Week


I managed to get a couple of pairs of bronze earrings finished last week that I photographed at the weekend and I also had a custom order for some bronze stacking bangles so it definitely has been a bit of a bronze week.

The bronze stud earrings above are made by melting bronze wire into pebbles then flattening the pebbles to create off-round and oval organic-looking shapes. After forming them into concave bowl shapes I tidied up the edges then paired them up and soldered them together with a fine silver ball for decoration and contrast.


I oxidized these then cleaned them up a fair bit so the dark areas are just in the crevices.

I also made some simple oval bronze earrings with an etched pattern and a turquoise jasper bead added to the earwires for a bit of colour.


I still find bronze a bit unpredictable compared to copper where liver of sulphur is concerned but I do love the golden brown colour you get when it does behave nicely and oxidize evenly :D

I also made a set of skinny bronze bangles with stamped letter disc dangles.


These were for a custom order and the initials stand for the names of the customers children. Not my usual thing as stamping letters in a straight line isn't a natural gift for me {!} but I can manage one letter!

I'm planning on making a set of leaf vein texture bangles using flattened 3.5mm {7g} wire very soon. My bronze bangle selection is a bit limited at the moment and needs more variety and as I'm getting more used to working with bronze and it's little quirks I feel a lot more confident in adding a few new designs. Watch this space!


Copyright © 2015 Cinnamon Jewellery. All rights reserved.