Showing posts with label handmade copper jewellery. Show all posts

Thursday, 2 July 2015

A New Copper Loop Bangle And How I Made It


I started making copper bangles sort of by accident. I had some thick gauge copper wire and didn't know what to do one night at a jewellery class I was at so decided to experiment. And I haven't looked back. They have proved to be very popular especially with men buying gifts for their copper wedding anniversary -  usually leaving it to the last minute! 

So it makes sense to expand on the designs I make which is why I experimented with this loop bangle recently. I cut a length of 2.6mm {10g} round copper wire and annealed it so it would be easier to shape. I guessed the length I would need - I had no idea how long the wire would need to be at this point. I used a bezel mandrel to form the loops starting at the centre point of the wire.


I had enough wire to form six loops with some left for the straight section. I annealed the wire again and hammered the curved sections then used a texturing hammer to add some pattern to the loops and the straight wire.


The next step was to solder the loops at the point where they touched each other. This would give the bangle stability. Without thinking I bent the ends of the wire up then realized I'd bent them the wrong way! I wanted to solder on the back of the loops {what would become the inside of the bangle} to minimize the amount of solder getting onto the front textured side of the wire. * I've since realized I didn't need to bend the ends of the wire at all, I can still solder the loops with the straight bits sticking out at either end!* ** Edited {again!} to add the reason I bent the wires in the first place was so the bangle would fit in my pickle pot - I knew there was a reason :D

I overcame my slightly senile moment by building a mini mountain from broken bits of soldering block so the wire ends could hang over the edges.


After soldering. 
A bit of clean up to do but most of it's on the smooth side so not too difficult to do.


After cleaning up the solder joins I straightened the wire and cut the bangle the right length for a medium size.

  
Flux applied and ready for soldering the join.


The bangle cleaned up and shaped before oxidizing in LOS.

 It was the prototype after all and it would look better with another loop. I always think an odd number looks better than an even number with things decorative. I've worked out the length of wire I need to start with to allow for that plus next time I need the get the loops a bit more upright and graduated in size which will hopefully stop the bangle sitting at an angle as much.

But for a first attempt I'm happy with it and it's just been listed on Etsy. I can see a few decorative options for the design too - I'm thinking silver balls and possibly coils.... :D


Hallmarked!
A bit late but this is the hallmark for my sterling silver bangles! I was so excited to see it when my bangles arrived back from the London Assay Office. I asked for a 3D laser mark as big as they thought suitable as my stamp is quite small at 0.75mm. I'm pleased to say I've sold a few of the hallmarked bangles too!


Copyright © 2015 Cinnamon Jewellery. All rights reserved.

Friday, 14 November 2014

More Ice Resin Experiments........ and Mistakes!


Carrying on from my post last week about Ice Resin experiments, I made some matching pairs of the curly whirly swirly designs that I've decided I like the most. After getting fairly well matched pairs by bending two pieces of the copper wire at the same time using my pliers, I soldered all the points where the wires met and sanded the shapes flat giving myself two very sore finger ends in the process.
The next step was to add the coloured resin. I mixed up about 20ml for the first batch and divided it into four pots which I then coloured with acrylic paints.

My first mistake...
Attempting to do too much at once and ending up with a sticky mess. The acrylic paint does make the resin thicker and more glue-like and while the first two coloured resins were still fairly runny and easy enough to drip into the copper squiggles by the time I got to the last two I'd made from the first batch of resin they were very thick and sticky making adding them to the squiggles really hard. This resulted in blobs of resin in the wrong place, overflows and me sticking my thumb where it shouldn't go {no not there!} and making a mess of what was a decent job on one of the squiggles.

I did manage to rescue them all but there was a bit of overflowing and quite a bit of swearing. The next day I noticed some resin seepage from some of the unsoldered points that I thought were tight enough together not to leak which meant some of the resin was at a slightly lower level than other parts but again not to the point I couldn't save it. Using my jewellers saw made quick work of removing any resin that had seeped out too.

How to avoid the same mistake next time...
Mixing up a smaller amount of resin each time and maybe sticking to two colours at a time. Concentrating on two pairs of earrings at a time so I don't start panicking and ending up with many, many plastic pots and lots of very sticky toothpicks and lolly sticks and bits of kitchen roll and baby wipes and blobs of resin scattered on the table and the floor. It really was sight to behold.

Using the oven to cure resin
I've read that you can cure Ice Resin this way at temperatures between 90F to 135F so I thought I'd have a go using my gas oven set at the "S" {slow cook I presume} setting. This setting is really too high but I thought I'd try it anyway. I used some resin I'd poured into bottle caps for this and left it in the oven for over an hour.
Here is what happened to it...


My second mistake....
The results resemble an explosion in a plastics factory. It was too hot and left for too long but it is cured and very hard! I am going to try this again but next time I'll heat the oven then turn it off and put the resin on the bottom rather than the top shelf and keep an eye on it, probably taking it out every now and then to check it. It would be fab if I could get this to work as curing my resin takes about four days in the airing cupboard at the moment.

Copper and resin earring experiments
The results of the pierced and bowl designs I made last week were varied shall we say. One problem I didn't consider with the pierced design using textured copper was the fact that I couldn't sand it afterwards without losing the texture so any resin that I'd spilled around the edges {and not noticed} would protect the copper from the effects of the LOS leaving it bright compared to the oxidized copper.
 Like this...


So that's an idea I won't be repeating!
The other pair were fine I'm glad to say. I took a quick photo in the late afternoon on the window sill in my shed on a rainy day so apologies for it being dark.


I didn't sand the resin as I do prefer the shiny version. The marks you can see in it are a reflection.

So back to the curly whirly swirly designs...
I was a bit daunted that I was going to have to sand all of these but once I got going it wasn't too bad. I did use a large metal file and an abrasive disc with my flexshaft to start some of the very bumpy ones off which did leaves some gouges in the metal and resin but that will be sorted once I've finished all the sanding. I'm planning on sanding up to 1500 grit as I would like it to look as smooth as possible without going as far as polishing it. I used a glass brush in water to clean the resin in between sanding which really helped to remove the "dirt" that gets ingrained in it. 


I'm planning to oxidize the copper but after trying it earlier today on another piece and discovering that wire wool scratches resin and leaves it dirty {again!} I'm going to leave the copper dark and "polish" the oxidation in the tumbler.

I've now run out of coarse sandpaper so I had to stop and clear away lots of soggy pieces of 80 and 100 grit and the small puddle of water on my desk. I'm off to Homebase later to buy some more. The joys of making resin jewellery!
I'll post the finished photos of these next week.....


Friday, 7 November 2014

Experimenting With Ice Resin


Or should I say more experimenting with Ice Resin! As a continuation to my blog post last week I have been at it again and doing some more interesting things with epoxy resin. 

My first attempts didn't cure properly, possibly because I didn't measure the two parts accurately enough or it might have been because I didn't mix the acrylic paint properly before adding it to the resin. Anyway, my second attempts which were the swirly abstract shapes you can see in the bottom right photo below did cure I'm glad to say. They are now leaning up against my work shed window and look really pretty with the light shining through them :D 


So armed with slightly more but still a fairly small amount of knowledge about resin I tried again on Wednesday. I made a few pairs of copper earrings, one with two little copper bowls soldered to the bottom and two more with pierced out shapes, then added some coloured resin.


In my haste to get going with the resin I didn't make sure the copper was clean so ended up with some copper dust in the bright green resin in the bullet shape earrings top left. I also wasn't very keen on my colour choices for the bullet shape earrings.......

I then mixed some more resin for a pendant and used some pretty pinks and oranges {which I did like!} Please excuse the poor photo but the light was going by the time I took it.


I took some more photos in the slightly better {but not much} light yesterday morning after they'd had several hours in the airing cupboard. I discovered a hair in one of the purple rectangles in the bullet earrings but as I don't like these very much anyway I'm not too bothered! They'll need a couple more days to cure properly then I'll oxidize the copper and add earwires to the other two pairs.


I'm not sure whether to sand the two resin "dots" completely flat in these earrings or leave them. Decisions! You can see my camera reflected in them as I took the photo, it's not another hair :D

I've got to say I am more drawn to the abstract squiggly wire designs and would really like to make earrings using this design. Which means creating a matching pair.... 

I flattened and soldered some more copper wire and rounded it to smooth out any kinks then started playing with my graduated pliers.


I soon discovered the smaller lengths of wire weren't long enough to be able to make anything big enough so I ended up with just one pair of fairly well matched earrings in the making....


These now need to be soldered at the points where the wires touch then filed and sanded flat. Then I'll solder a piece of copper tube to the top for the earwire. I'm really keen to get some more earrings made so I spent some time yesterday afternoon making more lengths of flattened wire - longer this time so I can make a few more pairs today.

Then I'll be able to get the resin and acrylic paints out again and start playing!

The results of all this and the finished earrings should hopefully be posted next week.....


Thursday, 17 April 2014

A Refreshing Break And Some New Jewellery


I recently took a holiday from my online shops for the first time in nearly five years! Yes I actually put my Etsy and Folksy shops and my website in holiday mode for two weeks. And the reason for this? Did I jet off to the Seychelles/take a road trip across the States/ move all my jewellery tools, equipment and "stuff" into what was a garden shed but is now my jewellery workroom? All very exciting options but it was the last one, the other two will just have to wait until my next break in another five years! 

Yes, I now have my own space to work in which is like being in heaven after working on the dining room table and in the kitchen for nearly five years, having to get stuff out and put it away again (then get it out again when I realize I need to do a bit more soldering!) I love my jewellery shed, it's not quite there yet with the organizing and finding homes for everything but it's mine. I'm planning on writing a post about it next week with photos once I've finished the final tweaking.

I did take the opportunity to catch up with making new pieces once I'd moved into the shed as I didn't have to worry about stopping to do findings orders and other things that usually stop me making jewellery. It was lovely actually :D
I used some of the shiny, sparkly cabs and half-drilled pearls I bought from Joopy Gems and made a few pendants and several pairs of earrings...


This is a hollow form pendant I started at jewellery night class. It started life as two different size diameter pieces of copper tube that I added a front and back to and a white pearl cabochon. The etched design was from a really detailed stamp that I wasn't sure would work but it did and I think it's a lovely busy pattern.


I used some silver textured in my rolling mill and added some smooth silver as an overlay with pale pink rose quartz rose cut cabs. I think they look like freaky bugs!


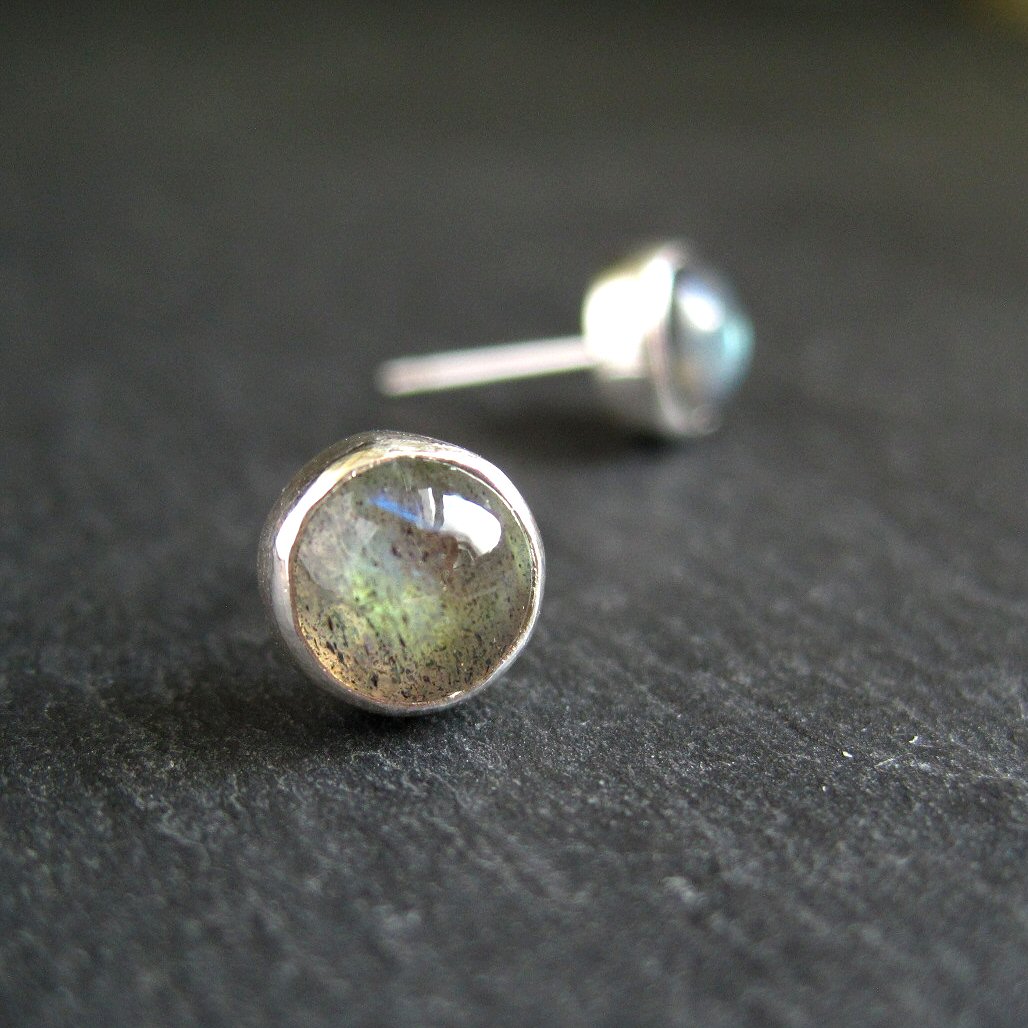
Believe it or not these are the first gemstone studs I've ever made plus a white pearl pair. The labradorite cabs have lovely flashes of green-gold and the peach moonstone are a sweet dot of colour.


These copper post earrings remind me of "spinning jennies" more formally known as the seeds of the ash tree. The green/gold quartz really sparkle in the light. This is the first time I've used posts in a longer style of earring rather than the usual stud style.


 And finally another two hollow form pairs I started at night class. These started life as round copper tube that I shaped using some bezel mandrels I bought a while ago. I always knew I'd find a use for those square/hexagon/triangle mandrels that were part of the set! I turned the square shapes into beads with a hole top and bottom and added them to some copper wire and thin tube to make a pair of twist earrings. The triangles have a leaf vein texture on the front and smooth sides and back. There's something very satisfying about making hollow forms and seeing the transformation from a solder covered piece of metal ( in my case anyway!) to a form that through filing and sanding ends up smooth with a barely visible solder line.

Look out for my post with photos (yay!) of my new workspace coming soon.


Wednesday, 22 January 2014

Rolling Mill Textures On Metal


I had another play with my rolling mill last week using some of the texture sheets from Etsy shop Rolling Mill Resource. I used some sterling silver and copper sheet and soon discovered it's best to get organized before you start!


I cut the sheet to size and worked out which design was going on which piece of metal. I also tried a feather but more on that later. Most of the sheet I used was 20g/0.8mm with one piece of 18g/1.0mm and one of 22g/0.6mm.

I've read that you should do a dead pass of the metal through the rolling mill with the gap the same size as the metal and texturing item. I'm not sure what this is supposed to achieve but I don't bother doing it. Judging the correct size of gap between the rollers is a trial and error thing that you discover by setting the gap then starting to roll the metal through. If there's too much resistance you make the gap bigger until there's just enough resistance to roll the metal through without giving yourself a hernia.

Here's some photos I took of the textured metal before pickling.


A leaf skeleton using silver and copper to sandwich the leaf. This gives you two textured pieces for the price of one. The texture shows up better on the copper due to the lighter colour but the design on the silver was just as crisp.


 The spiral design was a freebie (thank you!) I do love spirals but didn't buy that design for precisely that (predictable) reason!


 I love these two designs, they came out well and I think the one on the right on silver is the nicest one yet.


This is a nice circle and diamond design on 18g silver. It came out very clearly. The other design on 22g was fainter which may be due to the thinner metal or maybe it's just that particular design.


The designs after pickling.
 The piece of copper at the back was done with a feather with not the greatest results. I had the rollers too close and really struggled to get the metal through! A lot of shoulder bracing was involved but I got it through eventually. Once the metal gets so far it becomes hard to turn the rollers either backwards or forwards so you just have to use brute force! Consequently the feather moved so I have two images. It did work but it's very fine and would show up better if the copper was oxidized but I think if I try another feather I'll use a larger one (and not have the rollers too tight!)


The pattern on this piece of copper was a bonus! I used it to sandwich the textured card to print on the silver but ended up with a nice print on the copper too from the back of the textured card. Nice one!

Most of the card patterns can be used twice which is something that surprised me. I expected them all to be flattened after the first use but most of them still had enough depth in the design to use again.
So now I have lots of textured metal to play with I had better get on with making new pieces!