Showing posts with label hollow form earrings. Show all posts

Thursday, 17 April 2014

A Refreshing Break And Some New Jewellery


I recently took a holiday from my online shops for the first time in nearly five years! Yes I actually put my Etsy and Folksy shops and my website in holiday mode for two weeks. And the reason for this? Did I jet off to the Seychelles/take a road trip across the States/ move all my jewellery tools, equipment and "stuff" into what was a garden shed but is now my jewellery workroom? All very exciting options but it was the last one, the other two will just have to wait until my next break in another five years! 

Yes, I now have my own space to work in which is like being in heaven after working on the dining room table and in the kitchen for nearly five years, having to get stuff out and put it away again (then get it out again when I realize I need to do a bit more soldering!) I love my jewellery shed, it's not quite there yet with the organizing and finding homes for everything but it's mine. I'm planning on writing a post about it next week with photos once I've finished the final tweaking.

I did take the opportunity to catch up with making new pieces once I'd moved into the shed as I didn't have to worry about stopping to do findings orders and other things that usually stop me making jewellery. It was lovely actually :D
I used some of the shiny, sparkly cabs and half-drilled pearls I bought from Joopy Gems and made a few pendants and several pairs of earrings...


This is a hollow form pendant I started at jewellery night class. It started life as two different size diameter pieces of copper tube that I added a front and back to and a white pearl cabochon. The etched design was from a really detailed stamp that I wasn't sure would work but it did and I think it's a lovely busy pattern.


I used some silver textured in my rolling mill and added some smooth silver as an overlay with pale pink rose quartz rose cut cabs. I think they look like freaky bugs!
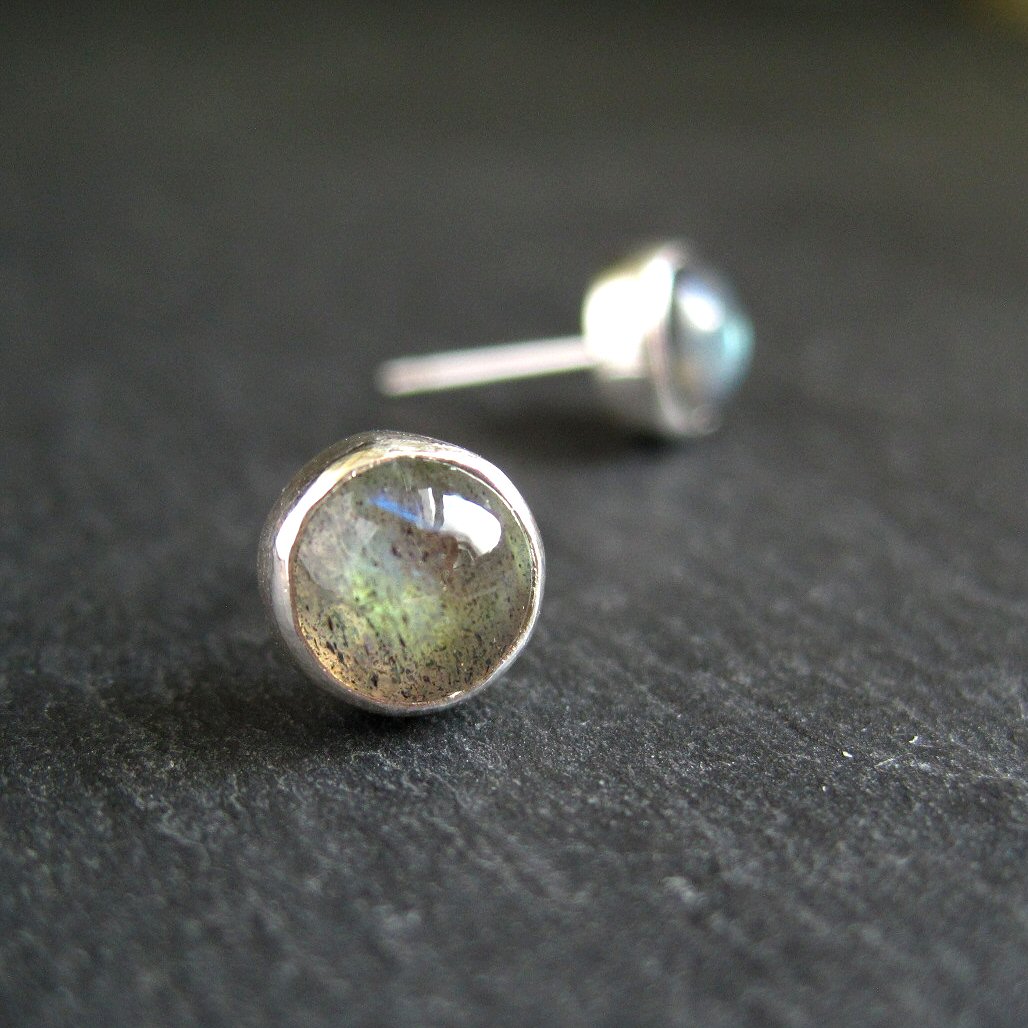


Believe it or not these are the first gemstone studs I've ever made plus a white pearl pair. The labradorite cabs have lovely flashes of green-gold and the peach moonstone are a sweet dot of colour.


These copper post earrings remind me of "spinning jennies" more formally known as the seeds of the ash tree. The green/gold quartz really sparkle in the light. This is the first time I've used posts in a longer style of earring rather than the usual stud style.


 And finally another two hollow form pairs I started at night class. These started life as round copper tube that I shaped using some bezel mandrels I bought a while ago. I always knew I'd find a use for those square/hexagon/triangle mandrels that were part of the set! I turned the square shapes into beads with a hole top and bottom and added them to some copper wire and thin tube to make a pair of twist earrings. The triangles have a leaf vein texture on the front and smooth sides and back. There's something very satisfying about making hollow forms and seeing the transformation from a solder covered piece of metal ( in my case anyway!) to a form that through filing and sanding ends up smooth with a barely visible solder line.

Look out for my post with photos (yay!) of my new workspace coming soon.


Thursday, 20 June 2013

Silver Hollow Form Pendant and Earrings


I recently finished my first sterling silver hollow form pendant. In my last post I said how much I love the look of hollow form pieces - the 3D solidness of them despite being hollow. Anyway I still love them after making my first version in silver!

I didn't take any photos this time but I promise to do so next time when I'm planning to make another one with a bezel set cab on the front. I used 24g/0.5mm sheet that I etched using nail varnish as the resist to create a dot pattern. I used a small brush for the nail varnish and managed to get it all over my fingers (course I did). I discovered you get a neater, rounder dot (which is so important to me because I'm slightly weird!) if you load the brush so it's almost but not quite dripping, hence the messy fingers. I bought some 5mm 24g/0.5mm strip from Cookson Gold for the frame or walls of the hollow form which is a bit extravagant I suppose as I could cut it myself but it just makes it a bit quicker to do.

I found the soldering easier to do than on the copper version. I use steel T pins to hold the frames down firmly onto the sheet and I did sand the sheet this time as well as annealing and flattening it with a rawhide mallet. I also used a different flux than usual - Tenacity 5 instead of Auflux. I like Auflux but being a liquid it tends to run everywhere so you need to apply it several times to make sure everything is covered. The Tenacity flux is a powder you mix with water to a paste consistency so it stays put. Incidently I discovered there is a burlesque dancer called Tenacity Flux - good name!


The solder flowed well all round both frames so I didn't have to do any further soldering to fill gaps. One problem I did encounter was fire stain - that greyish/purple staining caused by oxidation within the silver because of too much heat in one spot for too long. I did struggle with the Tenacity flux to know if the solder had actually flowed - it behaves slightly differently to the Auflux and I didn't notice the solder flow so probably held the heat on the silver for too long causing the fire stain. I did manage to remove it with sanding discs and my Dremel so it wasn't a catastrophe plus using liver of sulphur would help cover it up too if you didn't want to sand it out.
I did my usual and started finishing the pendant before I'd finished soldering on the bail and heart so had to sand the edges twice to remove the fire stain. One day I will learn to leave the finishing till after I've finished soldering! The heart was made from a fine silver ball that I hammered then filed into a heart shape. I think it adds a touch of cuteness to the pendant. The final shape of the pendant kind of forms itself - I start off with a shape for the frames them tweak them once they're soldered until I'm happy. I prefer free-form but I do want to try more of a flower/wavy edge shape soon.


The pendant feels fairly substantial at 6.2g despite being made from a thin gauge of silver which is handy as it means I won't need to get it hallmarked. I made some simple silver hollow form disc earrings too....... slightly easier than the pendant!


I was busy helping to paint the living room and dining room last week so didn't get a chance to make anything so you can probably guess how much I'm itching to get my torch and some metal out and start playing again this week.
My next post will be about how I made a hollow form pendant with bezel set cab with the promised photos :D

Wednesday, 5 June 2013

More Bezel Setting Practice And Hollow Form Earrings


I wanted to do a bit more bezel setting to improve how long it takes me to do. I am getting quicker at it, really! I sometimes "waste" time cleaning/ filing/sanding bezels up then change my mind about what I'm going to do with them and realize I will have to sand them again after another lot of soldering. Oh well :D

I thought I'd try decorating one of the bezels by stamping. I wasn't sure if it would work as the bezel wire is pretty thin at 0.3mm so I stamped fairly lightly. I didn't want to risk stamping too heavily and the bezel splitting and I also left a gap where the join was going to be. I think it worked ok with these simple turquoise cabochon earrings.


I stamped in the gap I'd left after soldering but not directly over the solder join. I think the stamped effect looks "right" with the turquoise.

I'm currently practicing making hollow form pendants in copper and will move onto silver in the next couple of days. I love the 3D look of hollow form pieces - they look so solid but are lovely and light.
I made a pair of simple hollow form earrings in copper recently before I started on the pendants. Simple as in a domed disc soldered to a flat base which is then trimmed and finished.


The pendants I'm making consist of a frame plus a smaller frame in the centre which are soldered to a flat sheet on both sides. The middle of the smaller frame is pierced out after the first side is soldered and the edges are trimmed at the end. They are a bit tricky to solder to make sure the solder join is complete all the way round on both sides and around the smaller frame in the middle but I'm getting better and will post about them as soon as I've made a couple in silver.


I soon discovered when I made these earrings that it's important to make sure you rinse all of the pickle out of them. You need the hole to prevent the piece from exploding when you solder the earwire (or anything further) onto them but that also means they get full of any liquid you put them into! I find leaving them to soak in clean water and bicarb for 15 minutes after I take them out of the pickle does the trick.
I've also started using hard sterling wire for the earwires instead of dead soft and find it is a bit sturdier for this type of earwire despite being annealed when it's soldered and it worked out slightly cheaper than the dead soft which is always a good thing!!