Showing posts with label etsy. Show all posts

Tuesday, 23 December 2014

All Bangled Out!


Yes it really has been a bangle-tastic very busy run up to Christmas in my Etsy shop and website with my copper and silver poppy bangle sets and singles proving to be the most popular choice with my buyers. Every time I checked my emails there would be one or two more bangle orders! I don't know what was going on but it certainly kept me busy for what felt like weeks. I counted up my bangle sales and discovered I'd made 103 bangles between the 1st November and 16th December. That together with made to order findings and earring sales {the earrings already made thankfully} I was starting to feel a little bit frazzled. And I still needed to do some more Christmas shopping and start writing my Christmas cards and do the ironing and lots of other very important stuff.....

As it got nearer to the cut off dates for Christmas posting to the US and within the UK I remembered what happened last Christmas with a few buyers wondering where their items were/could I make and send their order in the same day {yes, just!} and one bangle that was frantically ordered over the phone two days before Christmas. It was a scramble but thankfully everything arrived. But I just didn't want to do that again this year so I deactivated the bangle listings in my Etsy shop on the 16th.  Then the following evening I got a message on Etsy wondering what had happened to them I explained but then gave in when the buyer politely asked if I could just do one more for him....... He was very grateful but that was definitely it and I then put my Etsy shop on holiday and removed the shopping basket from my website.
  And heaved a sigh of relief.


This silver bangle with coil decoration was another popular choice this Christmas

I had planned on closing on the 24th for a couple of weeks to have a break and make some new stuff but I started to feel that if I saw another order for bangles I might just climb up onto the roof of my shed and throw myself off. Have no doubt I am so grateful for all the sales but I really need a break!!

So now I have some time to myself. I've got my cards written and the presents bought and went out for a boozy lunch with my friend. I've done those boring chores that needed doing. I also had time to unpack a little treat I bought myself recently. It had been sitting on the dining room table for about a week while I was still in the midst of my mad bangling session. It's this.....

PepeTools Premium Disc Cutter Kit 1/8" - 1" 412-445

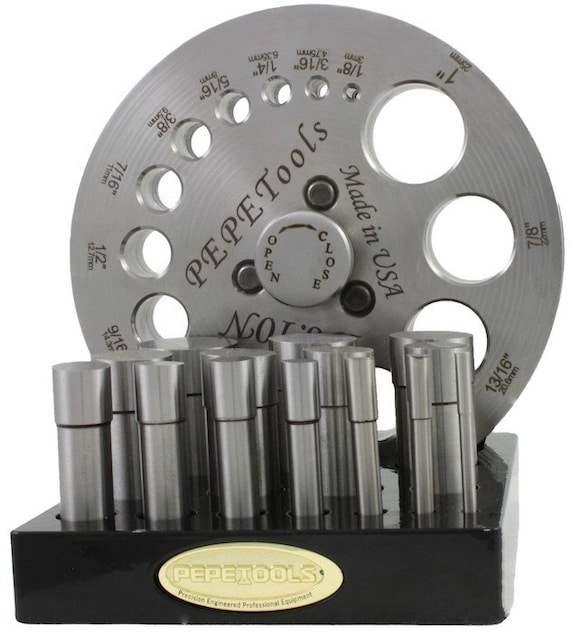
The Premium Pepe disc cutter. Quite expensive {say it quietly} compared to the economy versions I already own but it's a real beauty and it came with a set of centre finding punches which means I'll be able to make my own washers. I haven't got round to trying it yet but soon will!

 Even though my shop is closed I can't quite wean myself off Etsy and have been spending a bit of time on the forum reading lots of posts from sellers about their buyers complaining their item hadn't arrived yet and wanting a refund and one seller with 80 open orders two days before the cut off posting date who seemed quite chilled about it {complete madness!} I am quite happy that I can forget about all of that stuff for a while....although there is a chance I might still get an email from a buyer in America wondering if her last minute order will arrive before Christmas.....

I like this time of year as a lot of my jewellery that's been around for a while does tend to sell so it always inspires me to come up with some new designs for earrings and bangles and I also want to make more of the sgraffito enamel designs that I haven't had time to do yet and try again with resin. Having this spare time is dangerous though as I find things online that look interesting and I feel the need to try. The latest is anticlastic forming and I already have a stake and set of hammers lined up to buy "soon"........

Wishing everyone a very Merry Christmas!

Thursday, 4 September 2014

Decals And Torch Enamelling


I love adding designs to things so when I discovered you could combine enamel decals with torch enamelling I had to have a go. I ordered the decals a while ago and after a quick go which left me decidedly underwhelmed with the result I kind of lost interest in it and left the decals in a drawer for a while. I thought I'd better have another go last weekend so dug them out again.
I don't have my first attempt but I did discover that colours don't work too well. The bright designs I uploaded to be transformed into decals came back decidedly dull looking which looked equally dull after being fired onto the enamel.

Here's part of one sheet of decals ......


The photo is a bit deceptive as the decal sheets have a blue tint to them in real life due to the layer of varnish on top of the enamel decal which burns away during firing which isn't showing up in this photo. The colours are also a lot duller! {Damn you camera for making something look white just when I don't want you to!}
I thought I'd try using one of the black three ball flower decals this time and you can see the results in the top photo.

I was pleased with how they looked but bear in mind this was just a quick experiment. The colour of the decal changes to a sepia tone which is quite nice. I fired a layer of clear transparent on top of the round discs as the decals can sink a bit during firing.
The bullet shaped earrings had a harder time of it! I tried a coloured decal on them first and followed some advice I found online about applying the decal, letting it dry then sifting a layer of clear enamel on top before firing. The result was the varnish covering the decal ignited briefly and the already dull colours in the decal faded badly. I wasn't going to give up though so then added another layer of mint opaque enamel on top to cover it up and had another go with the black ball flower design this time.


This worked ok and also produced the interesting effect you can see around the edges where the clear enamel is pushing up through the mint opaque layer above it. I really like the effect and will be experimenting with it again soon  
I'm going to leave these two pairs of earrings for a while to see if any cracking or other weirdness happens before I do anything with them.

Here's another experiment with one of the coloured decals. This is the original design....nice and colourful....


and this is the result after firing the decal.....


The colours are very dull. I'm sure you've noticed that the enamel is badly cracked too. I didn't bother to counter enamel the back as it was a quick experiment. So after two layers of enamel and three firings the difference in expansion and contraction rates of the enamel and copper caused the enamel to crack the day after firing. I used 24g {0.5mm} copper sheet.
So for all those who torch enamel and think you can get away without enamelling the back on thinner gauges of metal, this is what can and probably will happen if you don't!


I have some more decals on order {no colours this time!} so as soon as they arrive I'll be experimenting again and will take photos of the process so I can post another one of these slightly rambling posts with much better results hopefully!


Friday, 8 August 2014

New Etched Copper Findings


I decided to put my shops on holiday last Saturday for two weeks which obviously means I'm on holiday too! It's nice to have a break from made to order findings and bangles and just have time to potter and to relax and think about all the stuff I need to do without having anything that must to be done by a certain date for posting.

I do have lots of things I want to do jewellery and shops/website wise and I am slowly getting round to them. I'm also spending some time doing another thing I enjoy - buying things online! I saw some Ball mason jars on Etsy and just had to have one of them. They were looking so nice as vases, candle containers and painted in pastel colours then sanded for a vintage look that I completely bought into the "I need one but I don't really know why, they're just glass jars...but they're so pretty!" reasoning..... After lots of searching {all part of the fun} I found a UK site called Uberstar.com where you can buy the mason jars in singles for £4.99. And so I bought three of the blue version...........


I haven't filled them with an artistic arrangement of wild flowers/stuck a tealight in them or painted them with eggshell paint yet. They are just sitting in my shed, but looking very sweet as they do it, waiting for me to have a "I know what I can do with them!" moment.....


Apart from internet shopping I did also get some copper etching done. I was out of etched copper findings in my Etsy shop so I spent a pretty sweaty afternoon in the shed getting annoyed because my black Stazon ink had dried up and the brown one I had was too wet. I left it uncovered in the sun for a while and it's fine now. The results of my labour in a shed that felt like a sauna it was so hot are in the photo at the top. I used a swirly detailed Indian style stamp on most of the shapes and a leaf design on some copper oval shapes I had which I love the look of :D


Medium and small size etched copper discs


Small leaf shapes with the same Indian pattern stamp design


Handmade copper washers with slightly off centre holes {still good for dangling though!} with the same Indian style design


And my favourites - the leaf stamp design on copper ovals. 
It was nice to get that job done. I have some new earrings designs in the making including some gold {yes gold!} stud earrings and I'm going to do some experimenting with enamelling too.
'Til next time.....

Friday, 18 July 2014

Making A Copper Link Bracelet : It's A Bit Harder Than I Thought!


To make a change from making bangles I decided to make a copper link bracelet recently. Since I've learned to solder I haven't attempted one yet and thought it would be a fairly easy, quick thing to make.
It probably is if you're not me..................


I started with 2.6mm copper wire and cut several lengths in two different sizes. I annealed the wire and bent it to form rough D shapes which makes it easier to join the two ends. My first idea was to solder and shape the links into rounds, texture and finish them then cut half of them open again and resolder to link them all together. Looking at how they lay when they were linked together I then thought the wire was probably too thick for this idea and the links might not sit very well when the bracelet was worn so I now needed to think about how to join the large links together in an interesting way.........

After some time thinking design thoughts {faffing about with copper wire in other words} I came up with a link design featuring a piece of wire balled at both ends which were then hammered and the wire bent over so the hammered ends touched and could be soldered together.


Soldering the small links.
I took this photo holding the torch in one hand and my camera in the other which is why the flame is miles away from the copper link {I can only concentrate on one thing at a time!}
Once all the links were done I hammered them with my mallet to flatten and elongate them and decided that putting two together facing different directions worked quite well and made the bracelet look a bit different.


I stamped a circle design on the ends of the links too and started connecting everything together. I liked the pebble shape of the large copper links so decided to leave them as they were. I then had to think about how the bracelet would fasten. I have a strange love/hate thing with fasteners and have never enjoyed making them despite making my own findings. I decided on a simple bar/toggle style fastener for the bracelet which could fasten with the copper link on the other end of the bracelet. It was simple to make - a length of copper wire with a loop soldered in the middle.


Once the bar was made I also made a small link to attach it to the last copper link on one end of the bracelet. I carried on with the hammered ball theme and made the small link by balling the end of a piece of wire, hammering and stamping then folding the wire into an oval shape and soldering the ends together.


So once everything was a ready I could start to solder the big copper links closed.


 After soldering and pickling and before cleaning up the excess{ive} solder!
 I started cleaning up the solder with a file and emery sticks then quickly changed to the much faster method of using abrasive bullets with my Dremel! The length of the bracelet at this point is about 8.5 inches so I need to shorten it by using my mallet to make the links wider. I also hammered them to flatten slightly and added some hammer texture to parts of the links
Incidently - has anyone noticed the mistake I've made yet? I realized my mistake just as I was about to put the finished oxidized bracelet into my tumbler.
The end link is too big for the bar......................bugger! I had a few options - make another longer bar, change the shape of the end link to make it thinner but this would also make the bracelet too long, or remove the end link and replace it with a smaller one which is what I did. I also had to use my torch to remove the liver of sulphur oxidation and clean up and finish everything again.


So here's the new version with smaller end link and a shiny copper finish again. Just why did I think making a link bracelet would be quick and easy?

Here's the finished oxidized and tumbled bracelet taken on my bench with my phone camera and experimenting with different settings which is why the photos all look slightly different.


I was pleased how it turned out in the end and I've learned what to keep in mind for next time! It was a prototype of sorts so the next one I make will hopefully be a lot easier and faster to make and will probably look a bit different to this one. I will post a couple of "proper" photos of it soon.


Friday, 13 June 2014

Copper Bangle With Ceramic Bead Tutorial


I've been meaning to make some copper bangles with ceramic beads for a while now. I bought some pretty pinkish and green ceramic beads a while ago and they've sat in my bead box patiently waiting for their moment of glory. It has now arrived!
I decided to photograph how I made the bangles in the hope it will inspire someone/anyone to have a go. It's an easy project and as long as you use ceramic or lampwork beads or anything that has been kiln annealed you should find the beads behave themselves during soldering and don't explode.


The most important thing to consider before you start is to make sure your bead hole is big enough for the wire you are going to use. The holes in these pink ceramic beads were a little bit smaller than the 2mm wire I used so I made them bigger using a round needle file. I tried various methods for enlarging the hole - using a drill bit and ball burr with my Dremel but they didn't do a lot so I stuck with using the file.


Form and solder a bangle as normal - I made the diameter slightly bigger than the normal diameter for a medium sized bangle to allow for the bead. Shape and texture the bangle to the finish you want. If you hammer texture leave a gap over the the solder join as it will be easier to clean up the join after resoldering. Use a saw to cut through the solder join.


Use your bracelet mandrel and mallet to shape the bangle so there's some overlap at the ends - this creates  some tension when you put the ends together and helps to make a better join for resoldering.


Open up the bangle sideways so you don't distort the shape and slide the bead onto one end. Slide the bead round so it sits opposite the join and manipulate the two ends so the join is tight. Soak in pickle for a few minutes. The beads are unaffected by the pickle.


I find the 2mm gauge wire is prone to moving as it's hard to get much tension to hold the join firmly together so I use T-pins to hold it in place. I put the honeycomb board on top of a fibreboard block as I can push the pins through the holes in the top block and then into the fibreboard underneath. This way is much less messy than just using the fibreboard block on it's own!
Keep the bead opposite the join and hanging over the edge of the soldering block at the back. Solder as normal keeping the flame near the join and away from the bead. Allow to cool naturally as quenching could cause the bead to crack. Once cool pickle and rinse.


File and sand the join taking care not to push the bangle out of shape.


Once the join is cleaned up you need to texture the area over the join to match the rest of the bangle. Use the bracelet mandrel but hold the bangle so the bead isn't in contact with the mandrel as you texture over the join. You'll probably find the bangle has gone out of round slightly as you've resoldered and cleaned up the join. You can use the mandrel to reshape the bangle but again keep the bead away from the mandrel. I hold the bangle at a higher point than normal on the mandrel so the bead isn't touching the mandrel and use my mallet to shape the bangle as I turn it to get it as round as I can. You can also tweak it with your fingers. Thicker gauge wire is likely to hold it's round shape much better.


Use a mallet and steel block to flatten the bangle keeping the bead hanging over the edge to prevent it breaking. This will also help to work harden the wire.


Use a pan scourer and washing up liquid to remove any grease from the bangle then oxidize in liver of sulphur. Clean up with wire wool. Tumble to polish and work harden. I tumbled these bangles for over an hour which didn't affect the ceramic beads at all.


A simple project but I hope it's proved interesting! My next quest is to find some larger hole ceramic beads to use with thicker gauge wire. A good excuse to go shopping!

Thursday, 5 June 2014

Give It A Twist - New Copper Bangles


One of my favourite jewellery makers to watch on YouTube is Soham Harrison. His calm manner and straightforward explanations make him very easy to watch. He posts new videos regularly and I caught up with some of them a while ago.
One of the videos showed how to make twisted bangles using round wire. I make a lot of bangles in copper and silver so I'm always on the lookout for new ideas and I really liked the look of them.

They are very easy to make and basically involve annealing a length of round wire before flattening three sections of it using a rolling mill or hammer. You then anneal the wire again, fix one end into a vice and grip the other end in locking pliers and twist. The whole piece of wire turns creating twists in the flattened sections. You then cut the wire to length and make a bangle as usual. A really simple idea with very pretty results!

Here's a few I made......


...with a single twist. This was my first practice bangle with just one twist and the wire left round but given a hammered textured with the round end of the ball pein hammer.


A triple twist bangle with two hammered textured bangles.


Triple twist bangles that I will be selling singly.

I'm currently in the middle of making a pair of copper twist hoop earrings with one twisted section at the bottom. You can see I'm really getting into the twist thing! I'll photograph those as soon as they're finished.

I'm also very pleased to announce that I've finally worked out how to use locking pliers correctly. I always thought you had to tighten the screw all the way for them to work and then wondered why they didn't grip anything properly when I did it that way. Now I know you tighten the screw just enough to be able to squeeze the handles closed and then they will grip things perfectly! {I had to watch a video on YouTube to figure that one out, oh dear :D}