Showing posts with label handmade copper bangles. Show all posts

Thursday, 28 August 2014

New Copper Bangles - Flowers, Beads, Twists And Linked Designs!


My recent holiday gave me a chance to come up with a few new copper bangle designs. They are a good seller in my Etsy shop and website so I figure expanding the range makes good sense.
I started by making an intertwined set using 2.6mm round copper wire. It's very simple to link the bangles - it just consists of an extra step once you've soldered, shaped and textured them. Two of the bangles need to be cut open again at the solder join and one of them linked with the remaining soldered bangle and the other bangle linked through the first two before they are soldered closed again and finished. I made the bangles slightly bigger than normal to allow for the space taken up by the bangles being linked. I then had a bit of a brain freeze moment about it all and thought they were still going to be too small but opening them out fully and measuring the inside diameter reassured me they were the right size {does that make sense? I hope so!}


Next I made a set using some lovely etched lampwork glass beads made by Su Bagley of Pixel Pyro Lampwork on Folksy. She made the beads with a larger hole than normal so they would fit on thicker copper wire. I made a set of three bangles with a hammered and line texture with one of the bangles having two of the etched lampwork beads threaded onto it before being soldered closed. 


The beads are in four lovely colours.


Next are two sets of poppy bangles - one with a copper poppy and one with a sterling silver poppy. I enjoyed making these even thought the soldering was a bit tricky to begin with {things moved!} However, now I know to make sure the flower has good contact with the bangle before I start soldering.
The poppy is formed then a balled piece of copper/sterling silver wire is threaded through the centre and the flower wire wrapped onto the bangle. I then added another wrap of wire on the other side. It's all soldered in place and the ends of the wire smoothed for comfortable wearing. 


I am slightly biased but these are my favourite of all the bangles I've made so far

The last new design is a set of three with one bangle with a single twist. Deceptively easy to make by folding the wire into a U shape, flattening the top section of the U with a hammer or rolling mill then annealing and pulling the ends in opposite directions. Then just cut to length and make as normal. 


I think that's enough bangletastic-ness for now!

'Til next time......


Friday, 13 June 2014

Copper Bangle With Ceramic Bead Tutorial


I've been meaning to make some copper bangles with ceramic beads for a while now. I bought some pretty pinkish and green ceramic beads a while ago and they've sat in my bead box patiently waiting for their moment of glory. It has now arrived!
I decided to photograph how I made the bangles in the hope it will inspire someone/anyone to have a go. It's an easy project and as long as you use ceramic or lampwork beads or anything that has been kiln annealed you should find the beads behave themselves during soldering and don't explode.


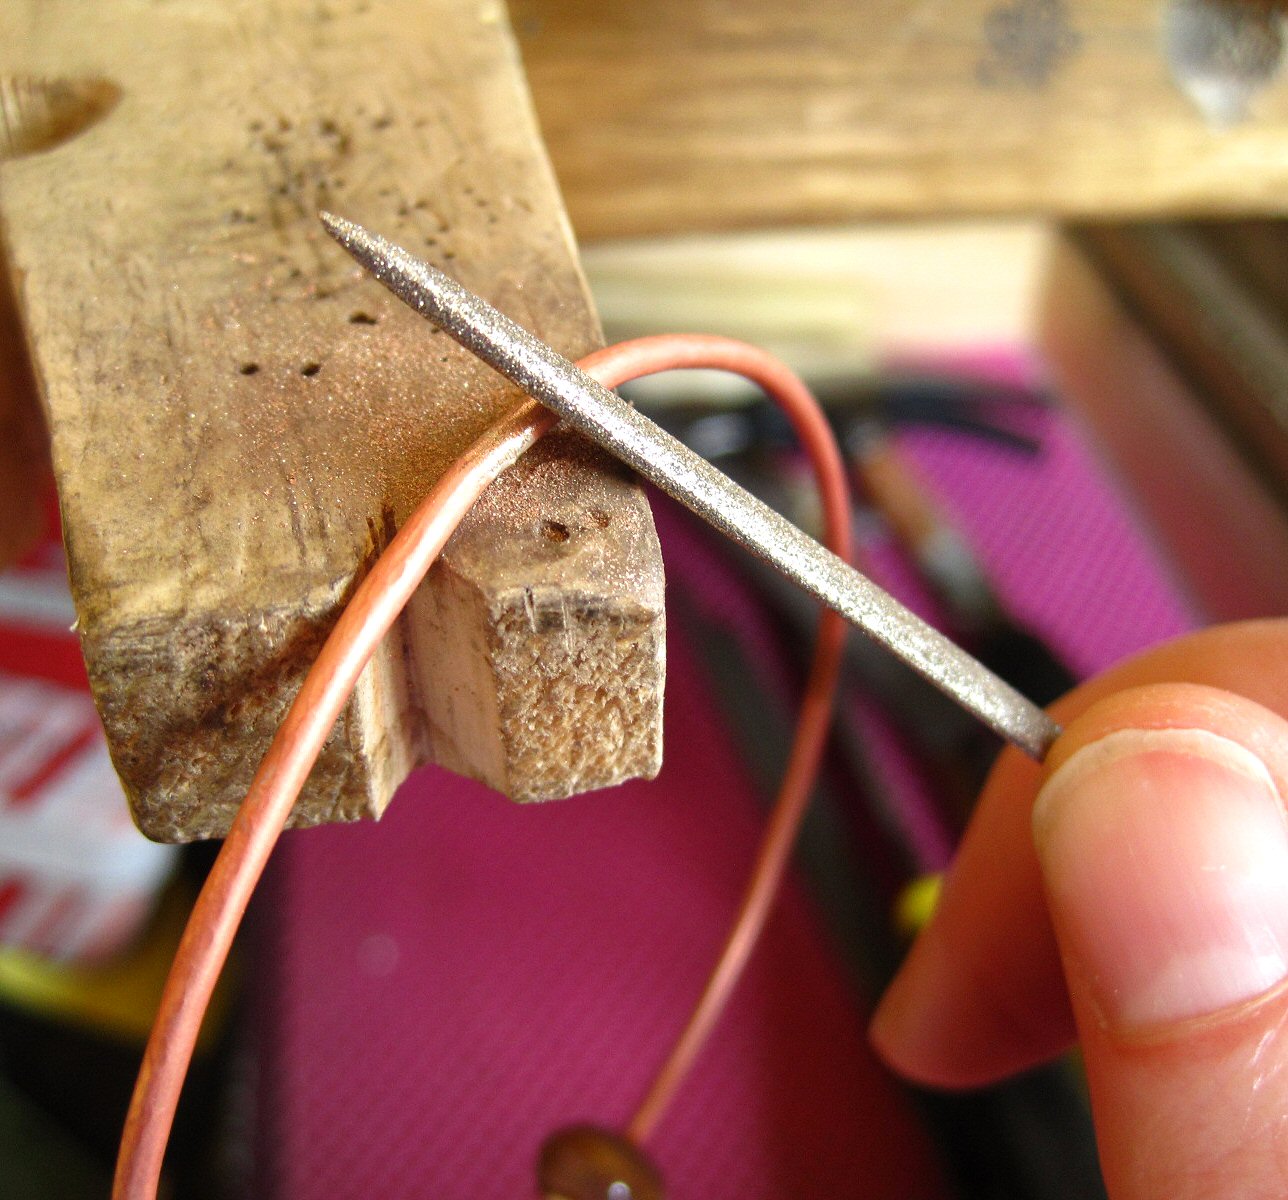
The most important thing to consider before you start is to make sure your bead hole is big enough for the wire you are going to use. The holes in these pink ceramic beads were a little bit smaller than the 2mm wire I used so I made them bigger using a round needle file. I tried various methods for enlarging the hole - using a drill bit and ball burr with my Dremel but they didn't do a lot so I stuck with using the file.


Form and solder a bangle as normal - I made the diameter slightly bigger than the normal diameter for a medium sized bangle to allow for the bead. Shape and texture the bangle to the finish you want. If you hammer texture leave a gap over the the solder join as it will be easier to clean up the join after resoldering. Use a saw to cut through the solder join.


Use your bracelet mandrel and mallet to shape the bangle so there's some overlap at the ends - this creates  some tension when you put the ends together and helps to make a better join for resoldering.


Open up the bangle sideways so you don't distort the shape and slide the bead onto one end. Slide the bead round so it sits opposite the join and manipulate the two ends so the join is tight. Soak in pickle for a few minutes. The beads are unaffected by the pickle.


I find the 2mm gauge wire is prone to moving as it's hard to get much tension to hold the join firmly together so I use T-pins to hold it in place. I put the honeycomb board on top of a fibreboard block as I can push the pins through the holes in the top block and then into the fibreboard underneath. This way is much less messy than just using the fibreboard block on it's own!
Keep the bead opposite the join and hanging over the edge of the soldering block at the back. Solder as normal keeping the flame near the join and away from the bead. Allow to cool naturally as quenching could cause the bead to crack. Once cool pickle and rinse.


File and sand the join taking care not to push the bangle out of shape.


Once the join is cleaned up you need to texture the area over the join to match the rest of the bangle. Use the bracelet mandrel but hold the bangle so the bead isn't in contact with the mandrel as you texture over the join. You'll probably find the bangle has gone out of round slightly as you've resoldered and cleaned up the join. You can use the mandrel to reshape the bangle but again keep the bead away from the mandrel. I hold the bangle at a higher point than normal on the mandrel so the bead isn't touching the mandrel and use my mallet to shape the bangle as I turn it to get it as round as I can. You can also tweak it with your fingers. Thicker gauge wire is likely to hold it's round shape much better.


Use a mallet and steel block to flatten the bangle keeping the bead hanging over the edge to prevent it breaking. This will also help to work harden the wire.


Use a pan scourer and washing up liquid to remove any grease from the bangle then oxidize in liver of sulphur. Clean up with wire wool. Tumble to polish and work harden. I tumbled these bangles for over an hour which didn't affect the ceramic beads at all.


A simple project but I hope it's proved interesting! My next quest is to find some larger hole ceramic beads to use with thicker gauge wire. A good excuse to go shopping!

Thursday, 5 June 2014

Give It A Twist - New Copper Bangles


One of my favourite jewellery makers to watch on YouTube is Soham Harrison. His calm manner and straightforward explanations make him very easy to watch. He posts new videos regularly and I caught up with some of them a while ago.
One of the videos showed how to make twisted bangles using round wire. I make a lot of bangles in copper and silver so I'm always on the lookout for new ideas and I really liked the look of them.

They are very easy to make and basically involve annealing a length of round wire before flattening three sections of it using a rolling mill or hammer. You then anneal the wire again, fix one end into a vice and grip the other end in locking pliers and twist. The whole piece of wire turns creating twists in the flattened sections. You then cut the wire to length and make a bangle as usual. A really simple idea with very pretty results!

Here's a few I made......


...with a single twist. This was my first practice bangle with just one twist and the wire left round but given a hammered textured with the round end of the ball pein hammer.


A triple twist bangle with two hammered textured bangles.


Triple twist bangles that I will be selling singly.

I'm currently in the middle of making a pair of copper twist hoop earrings with one twisted section at the bottom. You can see I'm really getting into the twist thing! I'll photograph those as soon as they're finished.

I'm also very pleased to announce that I've finally worked out how to use locking pliers correctly. I always thought you had to tighten the screw all the way for them to work and then wondered why they didn't grip anything properly when I did it that way. Now I know you tighten the screw just enough to be able to squeeze the handles closed and then they will grip things perfectly! {I had to watch a video on YouTube to figure that one out, oh dear :D}


Friday, 23 May 2014

Wrap Rings, Twisted Bangles and Fotor


I've had another busy week making rings and bangles for orders {which is great} so sometimes it's nice to just play without having to worry about getting things done for a certain time. I was inspired to make something quick and easy so thought I'd make a couple of no-solder rings seen in One Hour Rings by Helen Driggs. I loved the look of them and the fact they are adjustable {to a point}. They consist of a long triangle shaped piece of metal that is formed around a ring mandrel. I wasn't sure how sturdy they would be but after trying them with 20g/0.8mm sheet I would be quite happy to sell them knowing they will keep their shape well.


They become work-hardened pretty quickly as you shape them on the mandrel and I did need to anneal them in order to finish shaping them properly. I used a leaf vein texture for the first one which has to be one of my favourite textures. The second ring was textured using masking tape. It was a bit of an experiment and involved cutting small rectangles out of the tape with a scalpel before carefully sticking it on to the silver sheet and running it through the rolling mill. I tried a practice piece on copper where I cut the tape on top of the metal but I didn't like the cut marks that showed in the metal so did it the harder way!
The holes in the masking tape form the raised areas and the masking tape itself creates the texture on the rest of the metal. I'll be doing more experimenting with tape very soon as it's an easy way to texture with a rolling mill.


I also had a play with 2mm copper wire which I twisted into a barley twist then soldered to form bangles. The soldering was a bit tricky and it helps when forming the join to make sure you cut each end at the same point in the twist. I'll remember that next time!


Fotor
Have you seen those photos on Etsy where just one point is in focus and the rest of the image blurred? Or the main item is in colour and the rest of the image in black and white. Yes, so have I and I wanted to know how to do it so I Googled it and up popped lots of links including one for Fotor. It's a nice looking, free to use site that lets you edit, tweak, create photo collages and just play with images to your heart's content. You can then upload them to all the usual social network sites or save them to your computer. It has some of the editing features you find on Instagram but is much better in my opinion.

I had a little play with some of the photos I used above and with a photo of one of my cats.......


This is the Color Splash feature that allows you to choose which part of the image is coloured. You can also change the "background" colour too.


The Scratchy Pencil effect.


This effect is called Tile-Shift which lets you select an area to stay in focus and blurs the rest of the image.


With a frame added and a Moonbeam Lens-Flare on the ring image.


And finally a photo collage! 
What a very cool site. Check it out and play.................

Wednesday, 4 September 2013

Copper Bangles with Added Tricky Bits


Why make simple copper bangles when you can make "tricky" copper bangles? That's tricky to me anyway, other people would probably find them super simple! I'm talking about copper bangles with five small sterling silver concave discs soldered to the outside. Not hard to make just tricky.

I wanted to combine copper and silver as I love the look of the two metals together. The fiddly bit was the soldering of the silver discs to the outside of the copper bangles. I wanted then evenly spaced and was about to Google how to divide a circle into five parts when I realized I know how to do this already - just remember the length of wire you used for the bangles and divide by five!


After quite a lot of faffing about with my third hand and my fibre board soldering block (and swearing, mustn't forget that) I got the first disc soldered to the first bangle. Only 14 more to go. I had to pickle in between each soldering too which made it quite a laborious process but I got a little production line going in the end and managed to get the bangles finished with a big sigh of relief.

The main problem I have is that my reverse action tweezers I use with the third hand don't have a very good grip so things tend to move just when I don't want them to. I'm not sure what to do to sort this. If I could find some that had a firm grip I could possibly hold the bangle upright myself in the tweezers whilst I solder.

I recently bought another version of a third hand which looked a lot more sturdy. It has two grippers - for want of a better word - and it's own small soldering block in between. The grips seemed a lot sturdier when I first got it (after I tightened up all the screws about three times), but when I tried it with the bangles I found it even more awkward to use to be honest! It was hard to position and get it to stay in position. Oh well. It's the cheap version so that's probably why. I almost set fire to the rubber that covers the small feet underneath it too. I wondered what the funny smell was........


I also made some more twisted wire bangles with some of the wire I twisted at college earlier this year. These are great to make. The only fiddly bit is matching up the ends. I normally pick solder the join on bangles now as I find it a lot easier and quicker than chasing small bits of solder around when the flux bubbles, especially on twisted wire!


If anyone can help me out with suggestions for tweezers I can use to hold metal as I'm soldering that have a firmer grip than the wooden handle reverse action tweezers that are widely available then please do leave a comment!