Showing posts with label copper jewellery. Show all posts

Friday, 13 June 2014

Copper Bangle With Ceramic Bead Tutorial


I've been meaning to make some copper bangles with ceramic beads for a while now. I bought some pretty pinkish and green ceramic beads a while ago and they've sat in my bead box patiently waiting for their moment of glory. It has now arrived!
I decided to photograph how I made the bangles in the hope it will inspire someone/anyone to have a go. It's an easy project and as long as you use ceramic or lampwork beads or anything that has been kiln annealed you should find the beads behave themselves during soldering and don't explode.


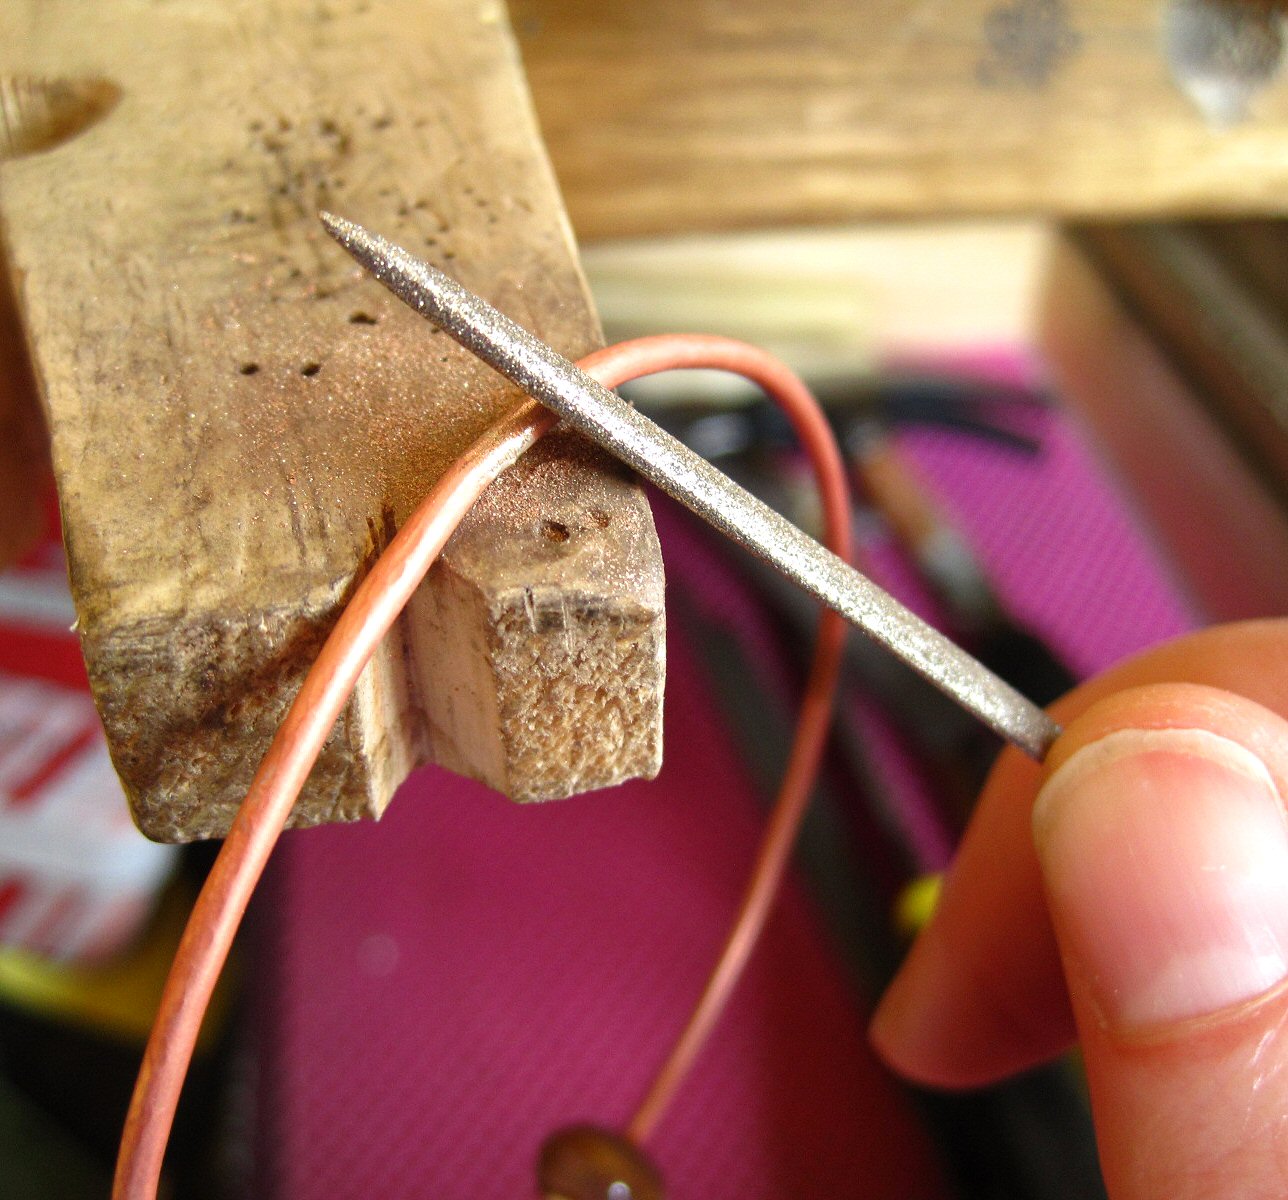
The most important thing to consider before you start is to make sure your bead hole is big enough for the wire you are going to use. The holes in these pink ceramic beads were a little bit smaller than the 2mm wire I used so I made them bigger using a round needle file. I tried various methods for enlarging the hole - using a drill bit and ball burr with my Dremel but they didn't do a lot so I stuck with using the file.


Form and solder a bangle as normal - I made the diameter slightly bigger than the normal diameter for a medium sized bangle to allow for the bead. Shape and texture the bangle to the finish you want. If you hammer texture leave a gap over the the solder join as it will be easier to clean up the join after resoldering. Use a saw to cut through the solder join.


Use your bracelet mandrel and mallet to shape the bangle so there's some overlap at the ends - this creates  some tension when you put the ends together and helps to make a better join for resoldering.


Open up the bangle sideways so you don't distort the shape and slide the bead onto one end. Slide the bead round so it sits opposite the join and manipulate the two ends so the join is tight. Soak in pickle for a few minutes. The beads are unaffected by the pickle.


I find the 2mm gauge wire is prone to moving as it's hard to get much tension to hold the join firmly together so I use T-pins to hold it in place. I put the honeycomb board on top of a fibreboard block as I can push the pins through the holes in the top block and then into the fibreboard underneath. This way is much less messy than just using the fibreboard block on it's own!
Keep the bead opposite the join and hanging over the edge of the soldering block at the back. Solder as normal keeping the flame near the join and away from the bead. Allow to cool naturally as quenching could cause the bead to crack. Once cool pickle and rinse.


File and sand the join taking care not to push the bangle out of shape.


Once the join is cleaned up you need to texture the area over the join to match the rest of the bangle. Use the bracelet mandrel but hold the bangle so the bead isn't in contact with the mandrel as you texture over the join. You'll probably find the bangle has gone out of round slightly as you've resoldered and cleaned up the join. You can use the mandrel to reshape the bangle but again keep the bead away from the mandrel. I hold the bangle at a higher point than normal on the mandrel so the bead isn't touching the mandrel and use my mallet to shape the bangle as I turn it to get it as round as I can. You can also tweak it with your fingers. Thicker gauge wire is likely to hold it's round shape much better.


Use a mallet and steel block to flatten the bangle keeping the bead hanging over the edge to prevent it breaking. This will also help to work harden the wire.


Use a pan scourer and washing up liquid to remove any grease from the bangle then oxidize in liver of sulphur. Clean up with wire wool. Tumble to polish and work harden. I tumbled these bangles for over an hour which didn't affect the ceramic beads at all.


A simple project but I hope it's proved interesting! My next quest is to find some larger hole ceramic beads to use with thicker gauge wire. A good excuse to go shopping!

Thursday, 5 June 2014

Give It A Twist - New Copper Bangles


One of my favourite jewellery makers to watch on YouTube is Soham Harrison. His calm manner and straightforward explanations make him very easy to watch. He posts new videos regularly and I caught up with some of them a while ago.
One of the videos showed how to make twisted bangles using round wire. I make a lot of bangles in copper and silver so I'm always on the lookout for new ideas and I really liked the look of them.

They are very easy to make and basically involve annealing a length of round wire before flattening three sections of it using a rolling mill or hammer. You then anneal the wire again, fix one end into a vice and grip the other end in locking pliers and twist. The whole piece of wire turns creating twists in the flattened sections. You then cut the wire to length and make a bangle as usual. A really simple idea with very pretty results!

Here's a few I made......


...with a single twist. This was my first practice bangle with just one twist and the wire left round but given a hammered textured with the round end of the ball pein hammer.


A triple twist bangle with two hammered textured bangles.


Triple twist bangles that I will be selling singly.

I'm currently in the middle of making a pair of copper twist hoop earrings with one twisted section at the bottom. You can see I'm really getting into the twist thing! I'll photograph those as soon as they're finished.

I'm also very pleased to announce that I've finally worked out how to use locking pliers correctly. I always thought you had to tighten the screw all the way for them to work and then wondered why they didn't grip anything properly when I did it that way. Now I know you tighten the screw just enough to be able to squeeze the handles closed and then they will grip things perfectly! {I had to watch a video on YouTube to figure that one out, oh dear :D}


Thursday, 7 November 2013

Etched Copper Pendants with Enamel and Turquoise


I recently finished two copper pendants that had been waiting on the sidelines for quite a time while I finished some other orders. I'd managed to cut them out and file and sand the edges then some findings orders arrived and they were return to the "to do" pile. But at last earlier this week I managed to finish them!

I used a mendhi style stamp I got from Hobbycraft for a £1 with Stayz On ink to stamp the design onto the copper then etched for about an hour. I love these type of detailed designs. My ferric chloride was on it's last legs and took longer than usual - it would normally take about 40-45 mins to get the light etched look that I prefer.
*Tip!* If you're planning to use stamps for etching I've found the fine line designs work and look better than the thicker line ones.
I then sawed around the edge of the design, filed and sanded and made the bails. Strangely enough I have never made a bail like this before. I've made hidden bails and p shaped ones but not the type that solders to both sides of the pendant. I really like the look of it with this type of pendant and you can decorate them anyway you want by hammering, stamping or etching. I soldered the bail on first then the silver ball and the bezel last.


I'd made the pink enamel "cabochon" a while ago and hadn't got round to using it for anything else and the colour looked ok with the oxidized copper so at last it was given a home. I made turquoise version too. I say "turquoise" but the cab isn't real turquoise but some kind of stabilized (what does that mean?) or composite material dyed to look like turquoise. It still looks nice though :D


Making this type of bail has given me ideas for extending the front section to form part of the design on a pendant, maybe using contrasting metals or textures. Definitely an idea for my sketch book for a later date.

I'm currently working on some more enamel pendants with pierced out heart designs that I really enjoyed doing which obviously means someone has taken over my brain. I used to absolutely hate sawing metal and now I actually look forward to doing it. Whoever has taken over my sawing brain still breaks blades though..............

Tuesday, 21 May 2013

Handmade Copper Bangles


Not usually something that crosses my radar being a committed earring freak, strangely I had a sudden urge a couple of weeks ago to make some bangles. I made the first one at night school as I needed something to do in the last couple of weeks that wouldn't take too long. I enjoyed making it - it was a hammered round bangle made from 2.6mm copper wire which I soldered three coils of thinner wire to.


 I soon discovered that soldering the coils onto it meant I couldn't reshape it. I used paste solder for the coils as I thought it would be easier but two attempts and some burnt blobby messes later I went back to sheet solder which worked. In the meantime the bracelet had been bent out of shape slightly plus it needed a good hammering to work harden it as it was a little "bendy" having been well annealed with my soldering attempts!
So having learned what not to do - I never got on with paste solder so why I used it I don't know! - I bought a bracelet mandrel and made a few more -


They are made from 2.6mm and 3.25mm copper wire and are textured with a hammer and stamped designs. Really fun and easy to make.


The twisted wire bangles were a bit more work. I rolled the wire through the rolling mill at college then twisted the flattened wire using a vice and big pair of pliers. Matching the join and soldering was a challenge - I discovered that wedging the solder in the join was the best bet as it had a habit of sliding round the twist as I started to heat up the wire. Thinking about it now pick soldering the join probably would've been a better option and even easier!


Thursday, 31 January 2013

Copper and Enamel Earrings


I really love the mix of copper and enamel in jewellery - the colour of the oxidized copper really makes the enamels jump. So continuing my "thing" about circles (it's been going on since I was a child!) I made enamelled discs in various colours and combined them with paddle-shaped copper "sticks."


 I haven't mastered the art of riveting enamelled pieces yet - it IS possible, I've seen other people do it but when I tried the enamel discs cracked. Another option would be to pin the enamelled discs by balling up silver wire on either side. I tried that too and only managed to ruin the enamelled piece. It did stick to the metal I wanted to attach it to but only because the enamel had refired and it would have cracked and fallen off eventually. 


So I stuck to wire wrapping the enamel disc to the metal - less risk of breaking anything!


I made these copper hoops a while ago and left them sitting on my work table until I decided what they would become. They became (......eventually) these wire wrapped hoops with three enamelled discs in turquoise, purple and mint wrapped onto the bottom so they can dangle in a shiny, happy, enamel way :D


Thursday, 16 August 2012

New Folksy Banner - That's Better!

You know when you look at your shop frontpage and think there's something missing? Well my Folksy shop has been looking, well, a bit colourless recently. My item photos are quite colourful but my banner was a bit dull and needed some work.
I remembered a pair of "traffic light" earrings I photographed last week made with colourful czech glass beads I bought from Lima Beads. I've been after the gorgeous pistachio green colour for a while and did see some on Etsy but thought I'd check at Lima Beads and they had the exact colour plus some lovely mustard yellow and an orangy-red in the czech glass so I bought them straight away!
I loved the three colours together so made a pair of earrings with some copper discs and used one of the photos to whip up a new banner. Much more colourful!

I took a lot of photos last week because we had sunshine in the UK - yes summer made a brief appearance again and now I just have to edit them all!

Tuesday, 3 July 2012

Embossing Metal With My Sizzix Bigshot


I must admit up until a few weeks ago I was vaguely familiar with the name Sizzix but as to what you actually did with a "Sizzix" I was completely in the dark! That was until I stumbled across a video from Vintaj showing how you could use their embossing folders with a Bigshot to create designs on metal ("metal" - my favourite word after chocolate!)
I was really impressed and itching to have a go, I just needed a Bigshot........ I waited a few weeks then when the urge to possess one overcame me I went out debit card at the ready..............and the shop had sold out! So I trundled off to The Range on the off chance and came home clutching my own surprisingly heavy pink and black wonder machine. It sat on the dining room table for a couple of days while I waited for the embossing folders I'd ordered online to arrive then the time came to start playing!


I started with some pre-cut 24g copper hearts and the Wildflower Vines and the Butterfly Swirls Deco Embossing folders. I was really impressed with the results. The design comes out really clearly. I added some patina ink on the practice pieces above to add a bit of colour.


Next I tried a Deco Etch folder on slightly thicker gauge copper and silver. The word "Etch" doesn't really describe the finished result - I'd say it looks more like a stamped design. I love this one especially after the metal is oxidized. I left the silver unoxidized for now as it's going to be part of a pair of earrings I have planned!
I used 22g gauge for these even though Vintaj recommend using thinner gauges - oops! But I had to try as 24g is a bit thin for my jewellery. I annealed the metal first to soften it and it went through the Bigshot fine.


These were annealed 24g copper using the plastic Sizzix embossing folders - the one's you use on paper and card. The design isn't as crisp but it's not bad. These have been oxidized and cleaned up with wire wool.


More examples! The more orangy coloured one's weren't annealed (the rectangle is 20g), the discs are 22g and 20g and were annealed first. Annealing the thicker gauge metal definitely helps to get a crisper design.


Deco Emboss folder top and Deco Etch folder bottom. The rusty looking areas are the red oxides from the annealed metal - I was too impatient to pickle first!

Overall I'm really impressed. Anything that lets me add patterns to metal is a great idea as far as I'm concerned plus buying a new piece of kit always pleases me!  Photos of finished jewellery coming soon!

Monday, 30 May 2011

A Bit Of A Featured Thing Going On!

There's definitely a featured thing going on at the moment - a pair of my earrings on fellow Folksy seller Linda's blog Uniquely Yours, one of the Featured Sellers on Folksy for the next two weeks (I'm thrilled about that, does it mean I've "arrived"?!) and a request for a feature on Handmade With Passon UK, a handmade directory and blog run by Crystal Clarke.


I'll have to start wearing dark glasses when I go to Sainsbury's at this rate................... :D


Sunday, 20 February 2011

You'll Never Catch Me Copper! Artfire Collection


A lovely copper jewellery Artfire Collection by Artfire seller DLC Welch featuring a pair of my lampwork and copper leaf earrings!