Thursday, 25 September 2014

Creating A Matt Finish On Torch Enamel Jewellery


Being a jewellery maker I love watching jewellery making videos, and especially learning new tricks that I can use on a technique I'm familiar with. A video I watched recently was Further Explorations In Jewelry Enameling: Kiln Fired Liquid Enamel And Sgraffito With Susan Lenart Kazmer. I don't enamel with a kiln but the techniques covered are still relevent for torch enamelling. It's a great video full of new ideas and Susan Lenart Kazmer is a likeable teacher.

One of the techniques covered was giving enamel a matt finish using Etchall etching cream. I've seen how lovely enamel jewellery looks with a matt finish and have always been intrigued with it and have thought of trying it myself in the past. The video showed how easy it was to achieve so I went on the cyber hunt for Etchall cream. I found some on ebay for £34 and another etching cream called Armour Etch. I really wanted the Etchall brand so started Googling it until I found some at a much more sensible price of £15.54 plus £2.95 postage from MDP Supplies.

Yesterday afternoon I decided to have a go........
I dug out some old enamelled bits I'd "tidied" into a plastic bag and forgot about. Some of them are pieces I started then decided for whatever reason {no idea!} to abandon and a couple were colour test pieces for a customer.


I cleaned the enamel by wiping over with kitchen towel to remove any dust or grease then applied the Etchall cream with a brush. I wore latex gloves as the cream will irritate skin.


The Etchall cream has the consistency of yoghurt and needs to be applied thickly and as evenly as possible. I went over any patchy areas with some more of the cream if it was needed.


After 15 minutes I used the brush to remove the etching cream and scraped it back into the pot as it is reusable, although for small pieces it's probably not worth bothering. I washed the rest of the cream off in water and dried the enamelled piece.


The result was a smooth egg-shell texture which I think looks great. It's very tactile and feels like smooth stone to touch.


I applied the cream to one side of this piece so the difference with the normal shiny finish can be compared. This piece had a layer of turquoise transparent over the opaque enamels before it was etched.


The green and pink flowers were half-finished abandoned pieces that had been enamelled with just one coat of opaque enamel so are a bit patchy but the etching cream worked well on them. I like the matt effect on the black enamel too.
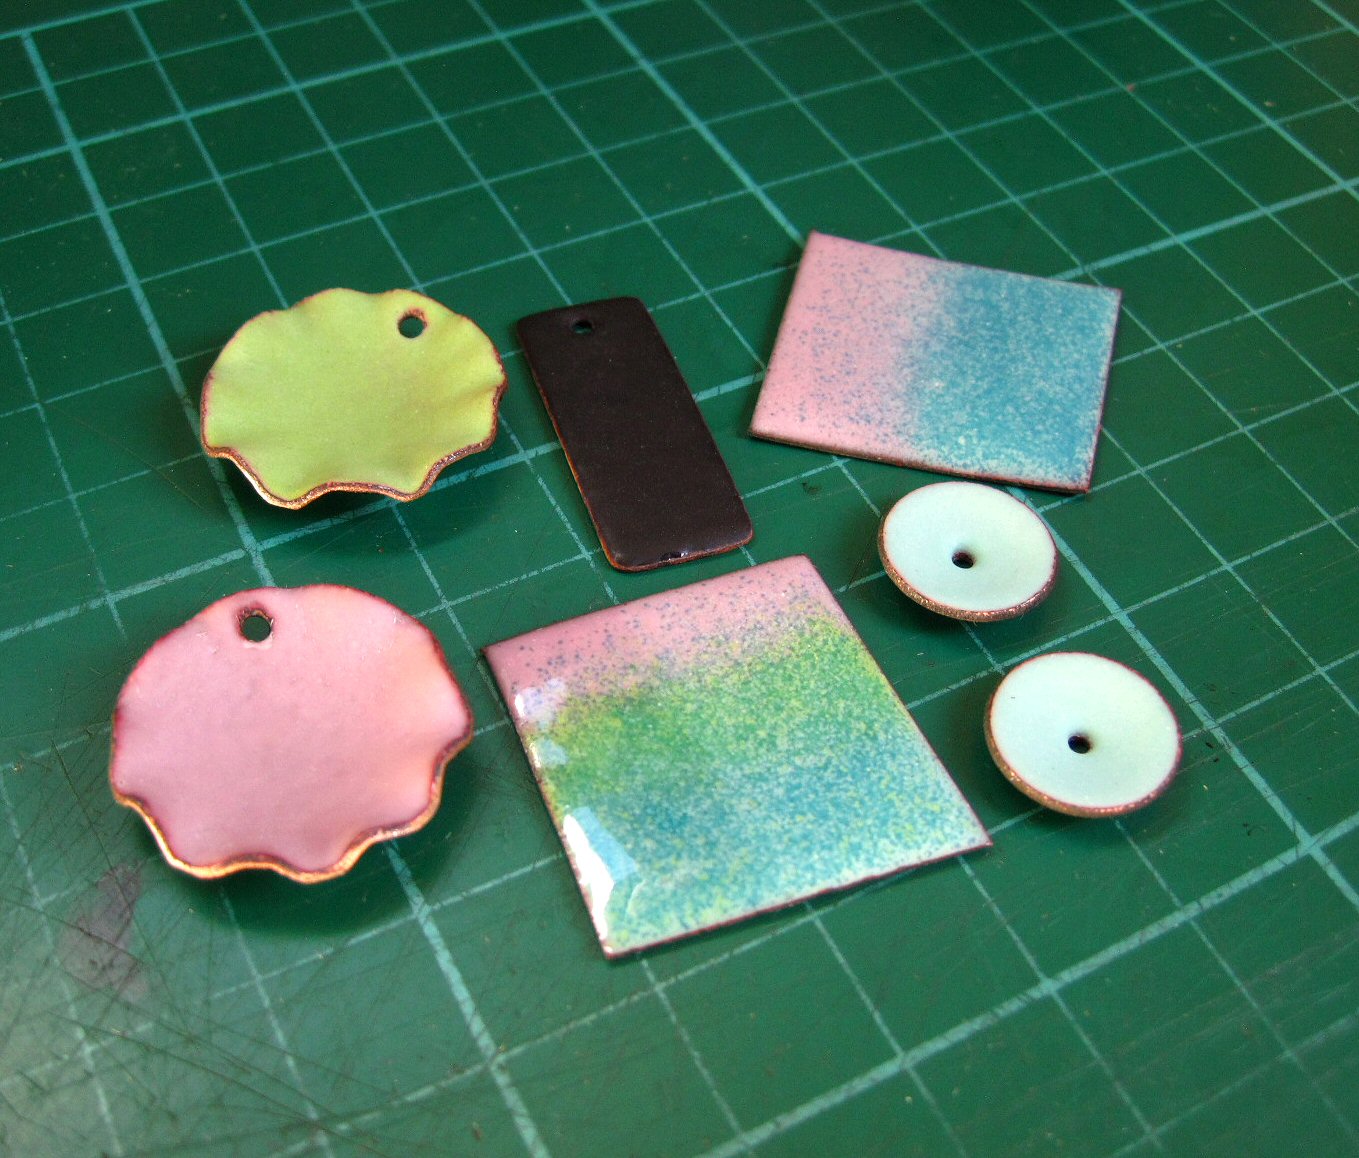

In conclusion, the etching cream is a definite hit with me and something I will be using to give a variation in the finish of my enamel jewellery. It's so quick and easy to use. One of the advantages of using it is there's no light reflection on the matt finish which can be a nuisance when you photograph enamel stuff.
Now I just wish I'd tried it sooner :D


Thursday, 18 September 2014

Enamel Decal Experiments..........And Mistakes


I've been playing again! I posted recently about trying some of the enamel decals I ordered a while ago and being a bit unimpressed with the results. Well I tried again and ordered some more decals, this time just in simple black designs rather than designs in colours. Previously the coloured decals I tried were a bit of a disappointment due to the colours losing their brightness during printing and fading after firing.

I uploaded my designs in PDF format to Fotoceramic and they then worked out the cost and sent me a PayPal invoice. I received the decals two days after payment which is pretty good service. Here's one sheet of the decals I ordered...


I ordered 6 of each design so I now have nearly 450 decals {Carried away? Me? Never!}  The total cost was £35.05 so they work out at about 8p each. You can create your own designs, use text {which is a great idea} or purchase digital graphics that allow commercial use.

So after counter enamelling and firing two layers on the front of my earrings it was time to choose the designs. I then trimmed the decals as close to the design as possible.


I soaked them in a bowl of water until the backing paper came away and using tweezers placed them on my earrings.


The decal slides around quite a lot until you blot it with kitchen roll so you can reposition it quite easily. You then blot it carefully pressing from the centre outwards to remove as much water as possible and leave it to dry.
There are various ways to dry the decals - if you are using a kiln to fire the enamel you can place the pieces on top of the kiln to take advantage of the heat, leave them somewhere warm such as a sunny windowsill or you can do what I do and warm up a soldering block using my torch then set the enamel pieces on top. I leave them for about 15 minutes and reheat the soldering block a couple of times.


 There's no sure way to know if the decals are dry as they don't change colour but 15 minutes in a warm place works ok for me. There's no point rushing this part {even though we all want to!} as the decals will bubble and be ruined if you fire them before all the water has evaporated.

Once the decals are dry I put the enamel piece onto the trivet and heat slowly keeping the torch a fair distance away until I'm sure the decal really is dry and isn't going to bubble. Then I move the torch closer and fire as normal. The decal smokes a bit then turns white as the enamel heats up.


The white colour then becomes transparent as the top varnish layer of the decal burns away leaving the enamel design.


After reading up on it I understood that I needed to fire the piece until the decal became completely smooth but as you can see in this photo the result was a design that was starting to break up and this decal still wasn't completely smooth. The decals can also sink into the enamel if they are fired for too long.
To stop this happening I decided to fire for slightly less time and to add a top coat of transparent enamel to cover the decal and give the earrings a nice smooth finish.


This is the orange pair with a layer of transparent geranium pink on top of the decal about to be fired.


So, the orange pair in the photo above were fired and the transparent just didn't look very pink. It had altered the orange base colour slightly but I wanted pink! So I added another layer of transparent in red this time and fired it again. Bear in mind this was the 5th firing....


Mistake #1
The shape of these earrings is much too long and thin meaning the trivets I use didn't support them properly. They were hard to balance on the trivets too and did tip up a couple of times depositing the enamel powder everywhere {cue swearing}. The difference in thickness of the top layers of enamel and the much thinner counter enamel layer resulted in a warped piece of copper.

Mistake#2
Too may layers of enamel. You can see in the photo the difference in thickness at the top and bottom of the earring.

Mistake #3
Dropping one of the orange earrings on the floor just after firing. And like a piece of buttered toast it landed front side down. On carpet. Yes my shed has carpet. Surprisingly the bits of melted carpet did come off very easily. But it didn't help.

So a few days later the earrings decided they'd had enough of all this stress and this is the result......


Notice this didn't happen until a few days later. The other earring is also cracked but obviously isn't such a drama queen as it's mate and decided to keep hold of it's red/pink/too thick/carpet textured shiny enamel coat.

Here's the rest of the decal experiments I'm glad to say worked :D 
The finished versions can be seen in the top photo collage.


The green pair with the flower decal are my favourites. I mixed up a new green mix using three different green opaques and now want to enamel everything with it!

Only 400 and odd decals to use up now so no doubt there will be more...... but not all in green.


Wednesday, 10 September 2014

Torch Enamel Earrings - More Poppies!


I do seem to have a bit of a poppy thing going on at the moment. My poppy bangle sets are proving to be quite popular - I had several made to order sets and singles to make last week and I sold the silver poppy studs I made too! 


So to carry on the theme because I like the shape I made a couple of pairs of simple enamel poppy earrings too. They are pretty easy to make once the enamelling is done. The balled sterling wire is threaded through the hole in the centre of the poppy then bent at a right angle before being bent up over itself to form a loop at the back that stops the enamelled poppies from flopping forward when the earrings are worn. The wire is then curved into an ear hook and finished.


I made the poppies in minty green and mauve and another concave disc pair in bitter green...


I was thrilled to see my new order of decals arrive today. The designs look really sweet and a bit clearer than the last lot so I'm hoping to have another go with them tomorrow