Showing posts with label torch enamel jewellery. Show all posts

Thursday, 23 April 2015

A Labradorite Pendant, Copper And Prehnite and Enamel Earrings


This is the pendant I made as a commission recently. It was a slightly different request from the custom work I've done before in that the buyer wanted me to use one of her own cabochons. She also wanted the pendant with a shiny silver finish.
If you read this blog regularly you'll know that I don't normally do shiny. One reason is just that I prefer the oxidized look especially with patterned silver. The other reason is getting a smooth shiny finish on plain silver is difficult!  When the piece features a textured silver top layer and quite a few balls it's even more difficult to get a good polish on it. Getting into the crevices even with radial polishers was tricky as they caught the edge of the top textured layer and would have worn the pattern away if I hadn't stopped. But, after a lot of finishing work I did get a decent finish on it and I'm happy to say the buyer was very happy with it and it arrived in time for her birthday which was nice :D

I felt the urge for some enamelling yesterday and produced these....


The pair in the middle were a bit of an experiment as the pink transparent I'd sifted over a decal came out cloudy. I was very tempted to chuck them in the bin but thought I'd try something else. The earrings started out with two layers of purple opaque then the decal then the transparent pink. I then sifted a layer of green opaque over the transparent and over-fired them so the transparent started pushing through the green layer. It came through as a rich red colour and produced small dots {and one bigger one!} giving the earrings an almost ceramic glaze look.

I also did a bit of sgraffito on the bottom pair then etched the enamel to give them a matt finish.


The etching cream applied thickly for 15 minutes before washing off and applying to the back.
I also use a glass brush to clean the surface once I've rinsed them.


The finished matt surface. The texture is very smooth and feels like eggshell. I recommend trying etching cream on enamel as it really is so easy to do. I bought my etching cream from MDP Supplies.

The finished earrings...


I also finished a pair of copper earrings too. I used some sweet prehnite rose cut cabochons as I love their pale green colour with the oxidized copper..


I'm currently on a mission to make several thicker gauge silver bangles that will need hallmarking. I've been a bit reluctant to make heavier silver stuff as hallmarking seemed so expensive and a bit scary {yes I know I'm being silly} but after being reassured by a fellow jewellery maker {thanks Claire!} I've decided to go for it. I'm already registered with the London Assay Office so it will be full steam ahead very shortly.


Copyright © 2015 Cinnamon Jewellery. All rights reserved.

Thursday, 30 October 2014

Around The World Blog Hop - Cinnamon Jewellery


Around the World Blog Hop

The idea behind the blog hop is for creative bloggers to write a post based around a couple of set questions. Their answers offer an insight into their creative thoughts and processes. The blog 'baton' is then passed on to a fellow artisan and so the trip around the globe gathers pace.

I was very kindly asked by Heather of Little Ram Studio on Etsy to continue the hop. Heather and her husband Gary create delightful lino cut prints of British wildlife, dogs and beautiful landscapes. You can read Heather and Gary's Hop post on their lovely blog Studio Tales.


What am I working on?
I've recently become very interested in using resin in jewellery after watching several videos by Jennie Milner , a US jewellery maker. Her work combines metalwork, art and resin and the result is colourful and fun jewellery.
I'm very drawn to colour in jewellery so once I found out you can colour epoxy resin whatever colour you like {yippee!} I was hooked and quickly ordered my Ice Resin starter kit.

I've literally just been playing around with it this week and have made a few practice pieces in order to discover what can go wrong and how to fix it....


The main problem I encountered is bubbles! The pot of mixed resin {top right} is full of millions of tiny bubbles. This is a problem a lot of people have and is solved by making sure the resin is warm. My resin and hardener were stored in my shed which during October in the UK cannot ever be described as warm! Adding the acrylic paint did help to get rid of a lot of the bubbles and the advice to breathe on the resin or use a flame to gently pop the bubbles also helped.

I decided to have another go the following day, this time I warmed the resin and hardener in a jug of hot water before I started, then again after mixing. This definitely helped a lot and although there were still some bubbles in the resin it was a lot less than the first time. This time I added the resin to some backless copper shapes I'd originally made to set some stones on but I thought they would be perfect for resin instead.


The results of my initial resin experimenting are bottom right. There are some issues such as streaks in the colour and tiny pits where new bubbles have risen to the surface and popped during curing. They still need another day to cure {set} properly before I can do anything else to them such as sanding or drilling. 

I still have a lot to discover and learn about using resin so this is an experiment that will be continued until I get it right. It could take a while......


How does my work differ from others in its genre?
In the past my jewellery has been described as dramatic and bold which isn't how I see it at all! I see it as a mixture of rustic, fairly simple designs with bursts of colour. I have been influenced a lot by the jewellery trends in the US and absolutely love working with copper. I think one of the things that maybe identifies my jewellery is pattern and texture on metal. I will always add texture to a metalwork piece using the rolling mill or by etching as I think it adds interest and works well when the metal is oxidized with liver of sulphur to give it an antique patina finish.


Sterling silver pendant with enamel cabochon

I also enjoy using enamel which I fire with a torch. It's a fairly inexpensive way to add a real splash of colour and I've recently started using enamel decals to add a further touch of interest to earrings and pendants.

The most important thing is that I haven't got to a point yet where I'm content to stop learning and focus on one particular technique - I love discovering new techniques and buying new tools {the latest is a mitre jig} which is why my jewellery style is pretty varied. I don't do "collections" as making the same items over and over would drive me nuts!


Torch enamel earrings with enamel decal

Why do I create what I do?
I was never particularly artistic when I was younger but I've found as I get older making things is a really good way to relax and forget the world for a while. It's like a bit of free therapy in a way. 
My thing about earrings is what made me start making jewellery - I saw some handmade jewellery online while I was shopping for earrings one day and it struck me that I could probably do that too. How fabulous would it be to make your own earrings? Very fabulous indeed  and I haven't stopped since.
I think I'm forever hoping to make that elusive "perfect" piece of jewellery and until I do I will continue to make new pieces and learn new techniques. I doubt I'll ever get there to be honest but the thought of it is what keeps me going!


Etched sterling silver earrings with freshwater pearl

How does my creating process work?
It varies. Sometimes I will have a very definite idea of what I'm going to make and at other times a design will just evolve and morph as I go. 
I recently started making a new copper bangle design featuring a silver poppy with silver wire wrapped around part of the copper bangle and soldered in place. 


Copper bangle with sterling silver poppy  

This came out virtually how I imagined it apart from a slight change to how the silver poppy is attached. The mechanics of a piece need to be considered too and I'm always concious of how wearable a piece will be. You can't have anything falling off or causing any kind of damage to skin or clothes.

I do sketch ideas in a pad and on bits of paper that are then stuck to my shed wall for when I need a bit of inspiration. I tend to be influenced by shapes a lot and I'm very fond of organic pebble-like shapes, swirls and dots. 
Sometimes the finished piece will look completely different to the original idea I had but that's fine, it's a good way to discover what works and what doesn't and makes the process more streamlined next time you make it. Some of my, let's call them experiments, are the one's that sell the fastest!

I hope you've enjoyed reading this and will check out the next post on the Blog Hop which will be written by Kristen of K S Jewellery Designs. Kristen makes beautiful sterling silver wirework and metalwork jewellery and if you love flowers you'll love her jewellery!


Wednesday, 8 October 2014

New Enamel And Copper Leaf Studs And Something Nice For Me

All of the enamel studs I had on my website have found a new home in Australia so it was lucky I'd made a start on a few new pairs a couple of weeks ago to replace them.
I mixed up some new opaque colour blends which I've christened rather grandly Apple, Denim and Amethyst. I've only just come up with the name for the purple mix - it was formerly just called "the purple one". Sounds a bit like Prince.☺

I also made some copper leaf studs using a leaf stamp design that I etched onto the copper then cut round and soldered sterling silver posts to the back.


Very simple but cute. These and the enamel studs are soon to be appearing in my Etsy shop and website.

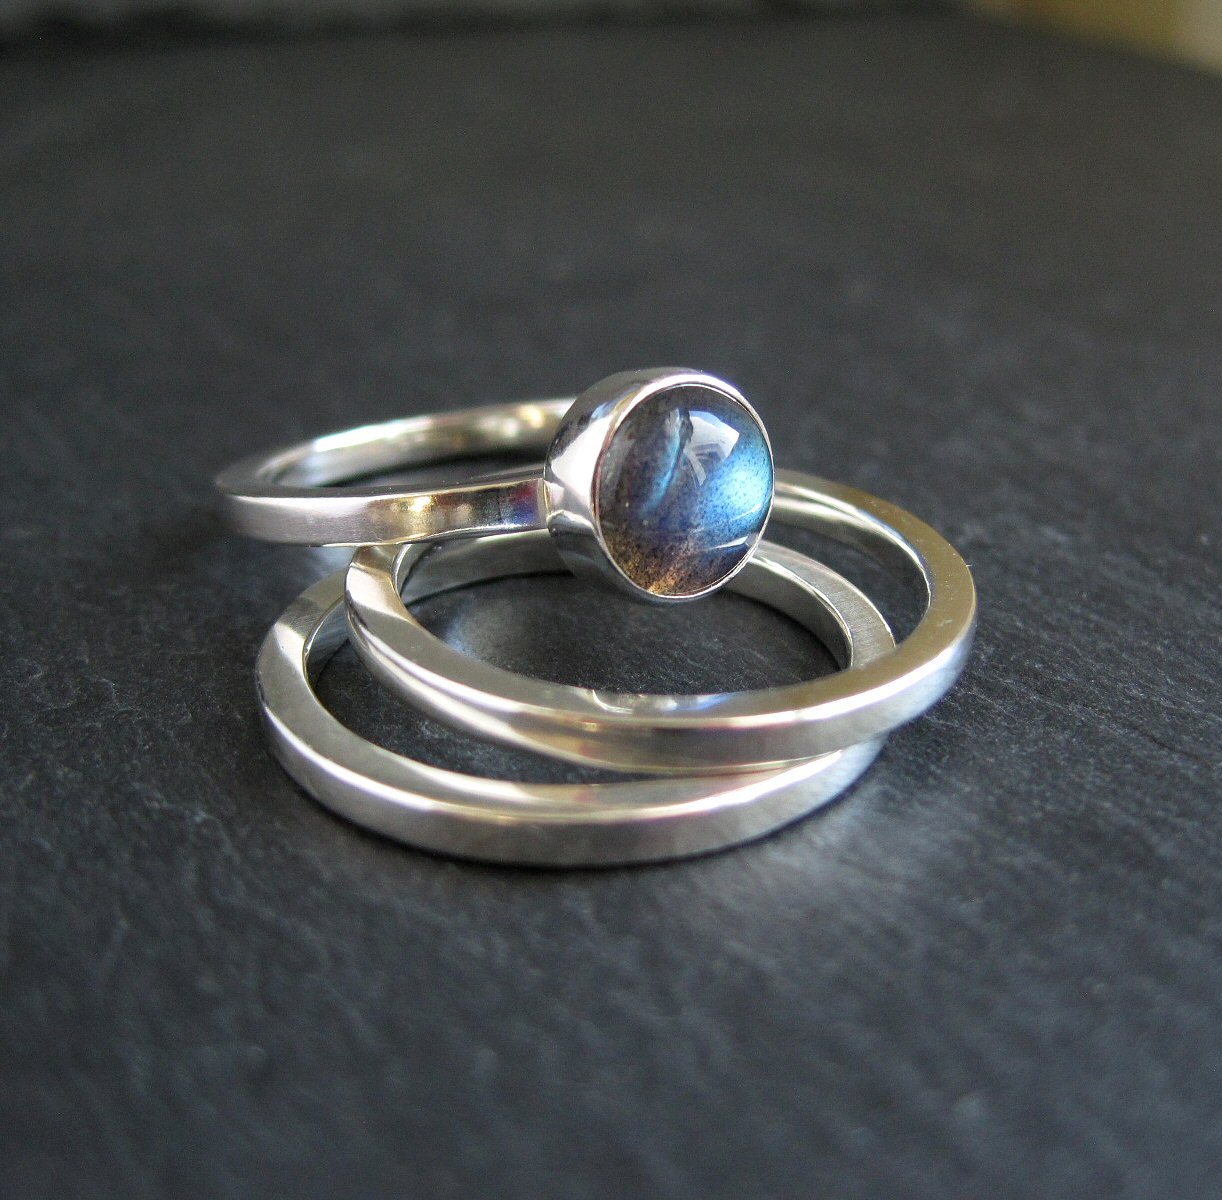
As it's my birthday next Friday (17th) I decided to treat myself to some new rings. I used 2mm square sterling wire for the first time ever and I really like the look of it. I'm now thinking of making some silver bangles using the square wire........


I used a lovely labradorite cab for one of the rings. It's a milestone birthday and I am quite shocked when I say the number out loud. I can't bring myself to actually type it yet but let's just say it's not 40. Luckily most people don't think I look as "old" as I am!

I've been dithering over what to buy as a birthday present to myself and have now decided to get a Foredom Flexshaft. I've managed pretty well with my Dremel but it does have a mind of it's own when it comes to what speed it's going to go at and it does mean you need one hand free to switch it on and off. The thought of a flex shaft with a foot pedal and slim handpiece seems like bliss after holding a heavy Dremel all this time.
 I shall be ordering one very soon.


Thursday, 2 October 2014

Torch Enamelling - Experimenting With Sgraffito


To continue my current tiny obsession with torch enamelling and decorative things you can do with your enamelled jewellery, I thought I'd experiment with sgraffito. The word sgraffito means "scratched" in Italian and according the the Encyclopedia Britannica is "a technique used in painting, pottery and glass which consists of putting down a preliminary surface, covering it with another, then scratching the superficial layer in such a way that the pattern or shape that emerges is of the lower colour"

A friend sent me a copy of a bracelet tutorial {thanks Debs!} by Angela Gerhard who creates the most beautiful enamel jewellery decorated using sgraffito. I'd love to post a couple of photos of it here but I remember doing an enamel treasury on Etsy a while ago and seeing a little note on her shop page about her photos being copyrighted so I will respect that - although if you Google her you'll see lots of her jewellery photos everywhere!

I decided to have a go at sgraffito this week. I cut several pieces of 24g/0.5mm copper to practice on. Some of them are bigger pieces than I normally use but I wanted a bit of space to play. I counter enamelled them then enamelled the front - two in black, two in purple and three in cream.

In the Angela Gerhard tutorial the next step is to apply a layer of liquid enamel but as I don't have any yet I used Klyre Fire which I applied liberally with a brush.


I hope you can tear your eyes away from the ripped out magazine page featuring a step-by-step wirework necklace project I used to sift onto. I don't think I could have picked a brighter, more distracting background for this photo if I tried... 
☺
The next step in the tutorial was to sift a layer of powder enamel on top of the liquid enamel. I sifted a layer of enamel onto the Klyre Fire and pressed it down gently with my finger.


I then used a variety of tools - an engineer's scribe, a fine brush and rubber tipped "things" I acquired a while ago to create the lines. The layer of enamel on this piece was too thick which results in a lot of the enamel powder piling up at the sides of the lines {a bit like snow when a snow plough has been through}. You then need to remove these little piles of enamel by using a bulb syringe {as in the tutorial} to gently blow them away or you can use a dampened brush. Otherwise they create thicker areas of enamel that take longer to fire.


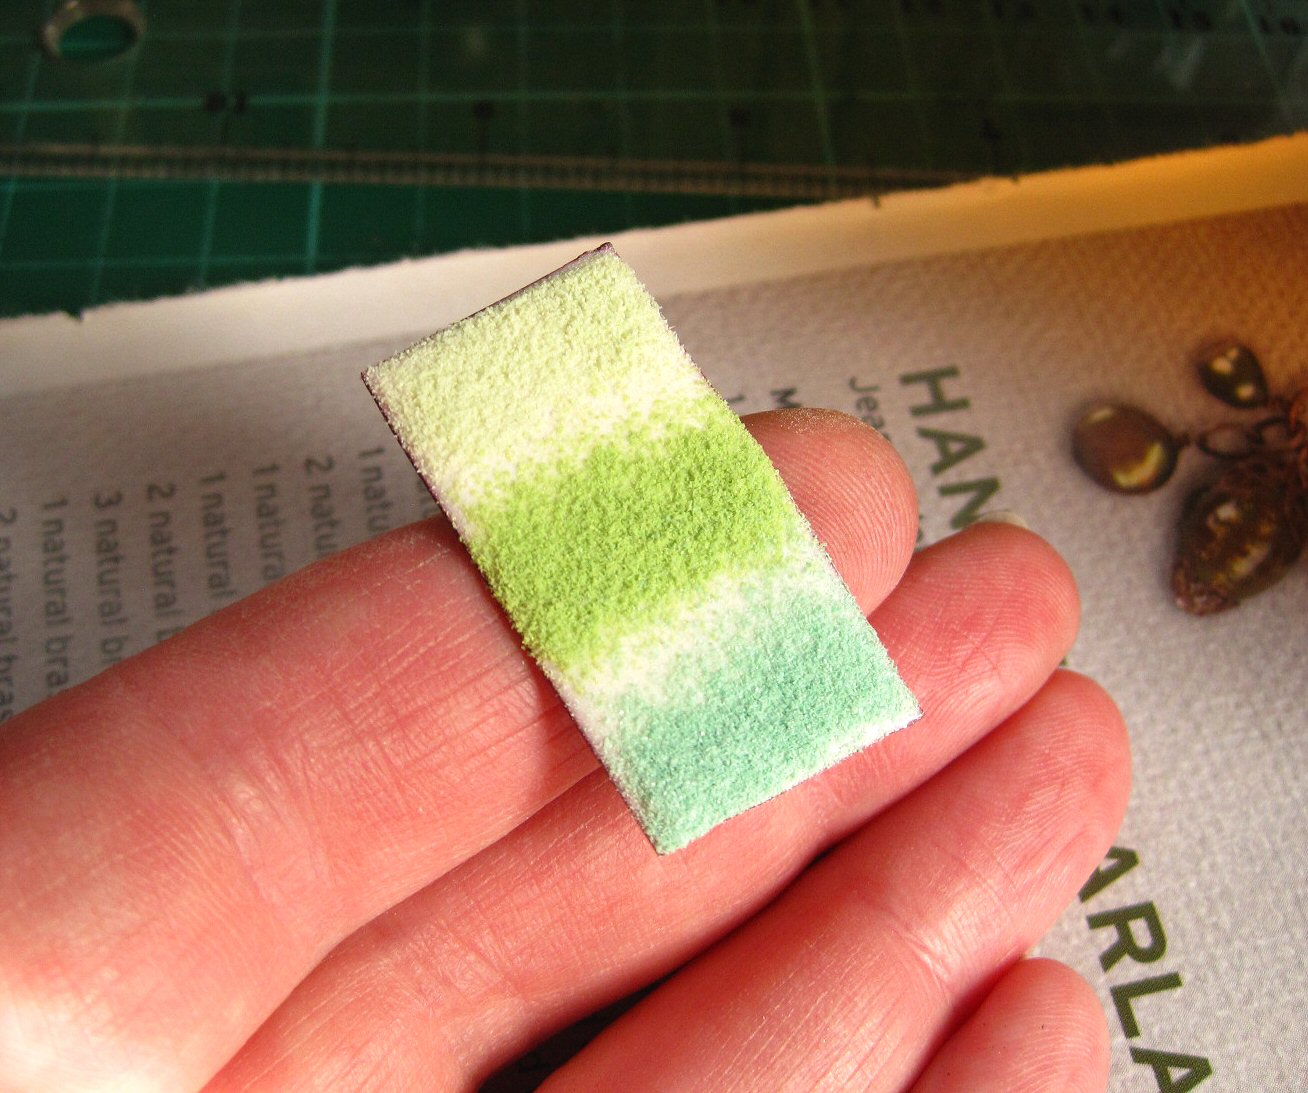
I had another go using a cream base and a thinner layer of three greens. I left a gap between the different greens too then used a small brush to create the lines. It definitely helps to have a pot of water handy to clean the brush and a piece of kitchen towel to blot the brush on to keep it clean between doing each line. The damp brush picks up the particles of enamel too giving you a neater finish to the lines if that's the look you're aiming for.


I fired each piece then lined them up on my shed windowsill to photograph {top photo}. I then decided to etch them as I love the matt finish it gives. Here are the results...


 What I've learned....

1.The first is I need to apply two layers of counter enamel if I want to make larger pieces. The counter enamel on a couple of the pieces took a bit of a battering but that could be due to the enamel on the front being too thick and taking longer than normal to fully fire.

2. A thinner top layer of powder enamel is better for achieving thinner lines.

3. I found drawing straight lines was easier with a brush than anything else.

4. I need a finer brush! The {cheap} brushes I buy seem to swell a bit when they get wet which doesn't make it easy to achieve neat lines. 

5. Although I like bright colours I'm drawn more to the cream background than the black. I'm also trying hard to ignore the purple and green colour combo I created, it's hideous!

6. I need to let go of my inner neat-freak and just go with it. I learned that the more precise you try to be with some enamelling techniques the worse the end result looks.

7.The matt look is very cool. Very.

8. I need to practice more.
 A lot more ☺


Tuesday, 18 March 2014

An Alternative To Jump Rings And Some New Enamel Pendants


Until recently I've always used jump rings to attach my enamel pendants to a chain. Enamel is great but some of the methods of attaching things to other things commonly used in jewellery, in other words cold connections and soldering can be a bit tricky when combined with it. It is possible to solder and rivet enamel pieces but not without some difficulty. So....I just used handmade jump rings and always felt vaguely dissatisfied with the final look.

Then I realized I could use my wirework experience and make my own bails! Why has it taken me so long to think of this? Who knows! I must have been thinking of "other things" (that means chocolate).
I made some new pendants last week, two with pierced out detail and finished them with a cold connected wire bail. 


Very simple in design - a length of 16g/1.2mm sterling round wire hammered at both ends and a hole drilled in the centre of the flattened areas. Tidy up the ends and bend into a loop then squeeze the ends gently so they sit close to the pendant on either side. Line up the holes then thread a balled up piece of 22g/0.6mm wire through and wrap around the loop to secure then trim and gently squeeze in the end. Oxidize and polish. Ta Dah! 


I think the bail makes the pendant look much more "finished" and is a vast improvement to a jump ring. You could also use this method to connect a smaller enamel piece to a large silver piece too. I'm also thinking that a small silver disc or decorative silver spacer would look nice sat between the ball and the front of the loop.
I'm just going to have to make some more enamel pendants and try!

•••♥•••

Tuesday, 5 June 2012

Like A Rainbow! New Enamel Pendants


I felt like doing some torch enamelling recently so came up with these colourful pendants using sgraffito and enamel pens.
Sgraffito involves scratching a design into the enamel, either the first layer to reveal the metal beneath or you can fire one colour, sift another contrasting colour on top then scratch out a design or just lines to reveal the first colour layer.

I went for three different colours which involved using pieces of cardboard strategically placed whilst sifting! Fiddly but I love the effect.


I used enamel pens to draw (I use the term loosely!) poppies onto pea green opaque enamel. After firing I added the brown dots to give the flowers a centre.


More enamel pen circles and dots. I don't find enamel pens that easy to use, they can be a bit blobby and having to hold them perpendicular and squeeze quite hard at the same time is not condusive to drawing pretty designs! Circles and dots are fine though! I will be experimenting further and making some earrings in  ....... ..... circle and dot designs too :D

Appearing soon in my Etsy and Folksy shops

Monday, 1 August 2011

Finished!


The commission I had last week that is.
Not the best photos I've got to admit but my customer was happy :D


  The necklace and earrings will be winging their way to Virginia this morning :D


Monday, 14 March 2011

Torch Enamelling - What I've been Up To Recently!


I've admired enamelled jewellery for a while now and not too long ago did a blog post about Etsy seller tekaandzoe and her wonderful kiln enamelled creations. I didn't think at the time that it was something I would ever be able to do as the cost of kilns plus lack of space would be a problem for me.

That wasn't until I saw an advert for a torch enamelling tutorial from US jewellery supplies website Beaducation by Steven James. It's a great tutorial showing the basics on how to torch enamel on copper. Of course I bought it! I then spent hours scouring the internet for more information on torch enamelling, where to buy the tools I'd need and of course the enamel powders. There are quite a few UK sites selling enamelling supplies and tools but as usual I found the US sites had more choice (why do we always lag behind?) I bought some enamel powders from a couple of UK sites to begin with - Cookson Gold have a good selection but bear in mind the leaded enamels have to be sent by courier which costs £11!

So armed with my prepared copper discs, a not very suitable trivet (I've since bought two much better one's from Thompson Enamel), a small kitchen sifter as the proper enamel sifters I'd ordered hadn't arrive yet (patience is a virtue I know!) and a few opaque enamel colours I nervously "had a go".
My first attempts were amazingly fine which surprised me, just one colour on flat copper discs, although I was slightly alarmed when the red enamel powder turned black on contact with heat (that's normal!) and that was it I was hooked! As I read somewhere recently - enamelling isn't difficult to do it's doing it well that's the hard part.

What I've learned so far :

• You must wear a particulate mask when using powder enamels - some enamels contain lead, arsenic, cadmium and boron - not the sort of stuff you want to be inhaling

• You can use a butane torch for enamelling - it works fine for small pieces

• Yes you do need to counter enamel (enamel the back) your pieces. Copper and enamel expand and contract at different rates when heated and cooling down and counter enamelling the copper helps stabilise the tension between the two reducing the chance of warping and cracking

• Transparent enamels do need to be washed if you want to use them over other colours otherwise they can appear cloudy. You can get away without washing them if you're using them directly onto copper though

• A fired piece that appears fine at first can fiendishly change after a couple of minutes, hours, days or weeks! Cracks, pits, tiny hairs that you didn't see at the time of firing and black spots can appear which can be very frustrating

• If you see a black spot in the enamel as you're sifting don't hope it will "blend in" and not show when the piece is fired, it will!

• Enamel pens (available from Thompson Enamel) are not very easy to use

• Two thin layers are better than one thick one

I'll stop for now but I could go on for much longer! Below are some of my fledgling enamel jewellery designs, I'm still finding my way and having fun experimenting. I'm pleased that some of my enamel pieces have sold which always helps when you're trying something new and wonder if anyone will actually like it! I'd love to hear from anyone with enamelling tips or anyone who's thinking of having a go themselves :D


Ivory and Coral Flowers


Purple and Lavender Discs


Opaque over Transparent


Seafoam Green and Chestnut Brown Flowers


Seafoam and Nut Brown

  Terracotta and Sterling Disc